Thursday, May 29, 2014

The Vegetable Bed Becomes the Kitchen Garden

Last spring I eagerly built a 4' x 4' raised bed for vegetables, convinced I would get a bountiful harvest. I know a lot about gardening, but I lacked experience with vegetables. I carefully followed the instructions in the All New Square Foot Gardening book, and my garden looked beautiful and organized most of the summer. I learned a lot, but I can't say I produced a lot of vegetables. I think my biggest mistake was underestimating how much sun I got in the spot where I located my bed. I also had a few watering issues--forgetting to water on a couple of hot days and, later on, getting too much rain for the tomatoes.

Last year's vegetable bed, as you can see, is covered in
shade in the middle of the afternoon. The mint and parsley
don't seem to mind, though.

This year, I've expanded quite a bit. The biggest change came when I decided to start a fresh cut herb business. My single small raised bed has now become seven raised beds that cover a total of 144 square feet. They contain a mix of mostly herbs, some vegetables, and a few flowers. Why flowers? Well, in addition to being great for cutting, they also will attract beneficial insects to my little organic garden.


My planting plan is loosely based on square foot gardening in order to make the most out of my space. With some of the perennial herbs, though, I had to give them a little extra space (especially mint and oregano), so they don't fit neatly in little squares. You'll see some gaps in my garden right now, mostly because plants are expensive! I'll take cuttings of some of my perennial herbs and fill in most of the holes this fall.


To save some money, I learned a lot about starting plants from seed this year. Starting from seed also allows me to experiment with varieties that are more disease resistant or tolerant of our Southern heat. I had success with growing tomatoes, peppers, parsley, and basil from seed indoors. (The chives were a flop.) I also planted squash, bean, sunflower, zinnia, and cilantro seeds directly into the garden.

If you look closely, you can see my little tiny tomato seedlings
in the upper left hand corner.

My focus on vegetables was on things I wanted to eat and weren't too hard to grow. Roma tomatoes are so versatile and perfect for salads, salsa, and homemade spaghetti sauce. Pole beans just seem like a staple of summer. We found this unusual white patty pan squash with some friends at a farmers market last summer, so I hunted down some seeds and planted it this year. My husband likes to grow and cook with some unusual peppers, so I planted these just for him.

That squash plant will fill up that bed and
then some by the end of the summer. I
don't think the beans will mind.
Everything else is herbs: basil, chives, cilantro, mint, oregano, parsley, rosemary, sage, and thyme. The tall grassy thing in the pictures is garlic--not really an herb, but an important culinary seasoning. I chose the herbs I thought people most commonly cooked with to start out with. So far they've produced enough to satisfy the demand at my local farmers market and then some. If you live in Macon, you can find me and my herbs at the Mulberry Street Market on Wednesday afternoons.

My little basil plants got a slow start this year.
If you're curious, here's my complete planting list:

Vegetables
Tomato 'Granadero (F1)'
Pepper 'Capperino (F1)'
Squash 'White Bush Scallop'
Pole beans 'Garden of Eden'

Herbs
Onion chives
Spearmint
Greek oregano
Common sage
French thyme
Rosemary 'Tuscan blue'
Basil 'Aroma 2 (F1)'
Basil 'Nufar (F1)'
Cilantro 'Slow Bolt'
Italian parsley

Flowers
Sunflower 'Summer Cutting Mix'
Zinnia 'All Summer Cutting Mix'

What are you growing in your kitchen garden?

Friday, May 16, 2014

The Cottage Garden, Year 2

 One of the very first projects I worked on in my garden was ripping out the bushes in front of my house and creating cottage-garden-style beds. Last year I mainly worked on the bed to the east side of my front door, which you can read all about here. That bed looked beautiful in the spring, but I discovered in the summer that the late afternoon sun was settling on my 'Twist-N-Shout' hydrangea and burning it to a crisp. I also discovered that I had poorly planned for winter, and that bed looked positively naked in January. My solution was to move the hydrangea to a shadier spot and replace it with a rosemary I've grown from a cutting. That spot might be too wet for rosemary (the surrounding plants need a lot of water), but since the plant is free I don't mind experimenting.

The first cottage garden bed from year 1 (above) to year 2
(below).

Everything else in that bed has pretty much doubled in size. The irises are currently covered in blooms and flopping all over the place. The climbing hydrangea has almost covered the trellis, and the lemon balm and bugleweed are competing for space.

Clockwise from top left: foxglove with iris, lemon balm with
bugleweed, hydrangea, and rosemary.

 This spring I finished filling the bed on the other side of the front door with plants. Much less planning went into this one than the last one. I just couldn't make up my mind, so I kept sticking plants I liked in there until I was done. It's a mix of plants from the first bed, other freebies, and a few impulse purchases. I played a lot with textures in this bed. I'll probably rearrange it next year after I see how all the plants do this year.

The new cottage garden bed 
Clockwise from top left: pink 'Flower Carpet' rose,
'Barbecue' rosemary with 'Silver Mound' artemisia,
hydrangea, iris with lemon balm.
In addition to the plants pictured above, I added some summer-blooming perennials which I'll add pictures of when they bloom later: 'Robert Poore' summer phlox and 'Summer Berries' yarrow. I like the appeal of different plants coming into bloom at different times, so those should give me something to look forward to during the heat of summer.

Feel free to leave a comment below if you have any questions!

Friday, May 9, 2014

April Showers Bring May Flowers!

I can't believe it's been over a month since I've blogged...April just flew by. In addition to the usual spring garden projects, I just started an herb business called Itty-Bitty Herb Farm. This was my first week selling herbs at the farmers market, so I feel like I can finally take a breath after the whirlwind of preparations.

When I stepped out into my garden this morning, I was delighted to discover several of my plants came into bloom this past week. You know what they say: April showers bring May flowers. One of my favorite things about gardening is how my garden is constantly changing, and in the springtime there's always something new to enjoy. A flower coming into bloom is like receiving an unexpected gift. I thought I'd share what's blooming in my garden right now. 

Some friends dug these irises out of their yard
for me a couple of years ago, and they've
settled in quite nicely. I think it's Iris virginica
(blue flag iris).

Pink 'Flower Carpet' rose

Foxgloves (Digitalis purpurea) are biennial,
so I wasn't sure if they would come this year.
Looks like they had some babies last year who
bloomed this year. 

My 'Munstead' lavender isn't quite in full bloom, but I
think the delicate buds are lovely.

My 'Red Drift' rose just exploded in blooms! I've had it since
I lived in an apartment, and it's clearly settled into its new
home since I planted it in my landscape last year.
I inherited this mystery rose when we bought our house,
and this is the best it's looked since we moved in.

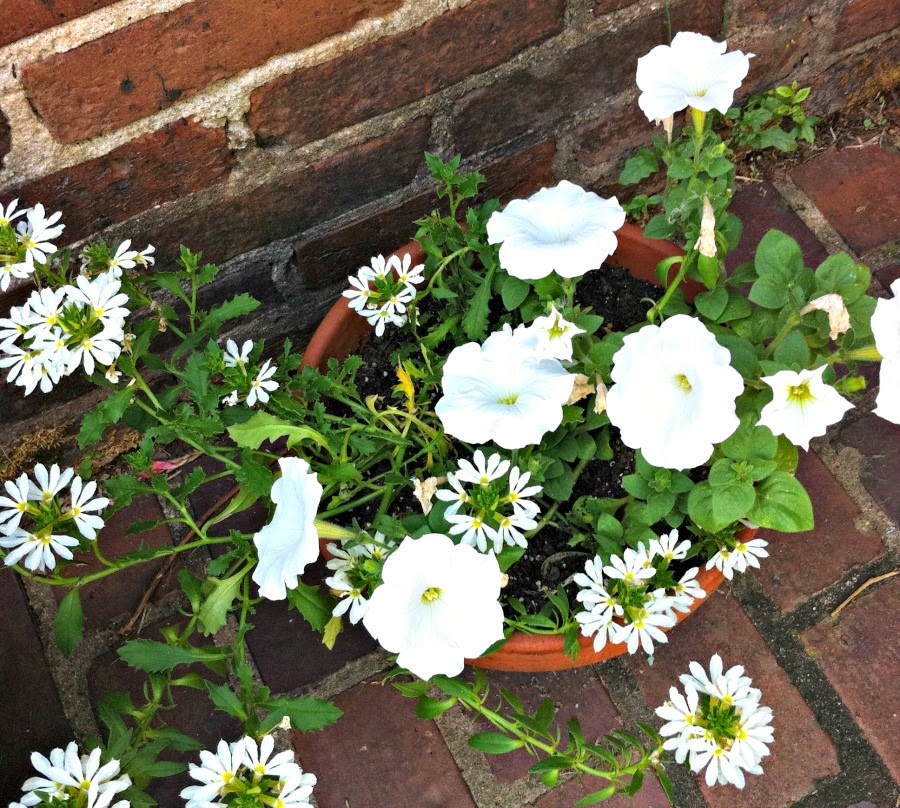
I had an itch for some white flowers, so I planted this little
container with some white petunias and white fan flower
(Scaevola aemula).
If you have any questions about these plants, feel free to leave a comment below! I'm happy to answer any questions you have.


Thursday, April 3, 2014

My Spring Garden Tour

This is just one of those weeks in my garden that I want to capture forever, a rare day when everything seems to be blooming all at once. The plants that bloom in early spring are still in bloom, and the ones that bloom in mid to late spring are just coming into bloom. The camellias are still hanging on, while the bulbs are popping up, and leaves are emerging everywhere. I took some time today to take pictures, in the hopes of preserving the memory, and I thought I'd share them with you.

Flowering cherry tree

Flowering cherry tree
My cherry tree has been in bloom for a couple of weeks now, and I swear it's even more beautiful this year than it was last year. The first picture is actually from last week, when it was at its peak of blooming in all its white glory. The second photo is from today, when the leaves have started emerging, the blooms have turned from white to pink, and the petals have begun to fall like pink snow.

Muscari armeniacum (grape hyacinth) &
Hyacinthus 'Delft Blue'
I picked up a mixed bag of hyacinths at the hardware store in December (you can usually find bulbs on sale around that time). The little ones emerged first, and the bigger ones are just starting to pop out. And yes, I am a little behind on my weeding in my flower beds. I'll get to that eventually...

Tulipa 'Happy Generation'

Tulipa 'Bastogne'

The striped tulip ('Happy Generation') is left over from a container planting I did last year. I didn't think they'd do so well two years in a row, since I didn't make any special effort to store them properly. I actually left one of them lying on the patio all summer; I only stuck it in the ground in the fall because shoots were coming out of it. Apparently they're more tolerant of abuse than I realized! I picked up a bag of red tulips in December, and this is the first one that's bloomed.

Verbena 'Homestead Purple' flower among rose leaves
I found a stray purple verbena bloom popping out from among the roses.

Gelsemium sempervirens (left) and Vinca major (right)

Carolina jessamine (Gelsemium sempervirens) grows in large planters on either side of my front door. It doesn't have as many blooms since I moved it to the shadier location, but it still has a couple this year. Periwinkle (Vinca major) grows entangled in a bed of ivy and honeysuckle alongside my patio. It makes a lovely groundcover, especially for shady areas, but it can become invasive in wooded areas in the South. Vinca minor is its smaller, less aggressive cousin, which is usually a better choice for the garden.

Hosta hybrid
It's so nice to see my hostas returning from their winter sleep next to my patio.


I haven't planted any vegetables yet this year, but I still have some lettuce hanging on from last fall. I'll get to work planting my summer veggie garden here in a couple of weeks.

Cornus florida (dogwood)
I actually climbed up into my dogwood tree in order to get a better view of the blossoms. They really are one of my favorite spring flowers. In addition, the trees grow to a nice, small-to-medium size and get some lovely color in the fall. In my opinion, no Southern garden is complete without a dogwood tree.


From the dogwood tree, I had a birds-eye view of my kitchen garden. As you can see, I've added quite a few raised beds recently. I'll update you soon on all the new developments in my kitchen garden.

Monday, March 24, 2014

A Pink Container Garden for the Pinkest Party


Here in Macon, GA, we're in the middle of the Cherry Blossom Festival. For those of you who don't know Macon, the Cherry Blossom Festival is a big deal. Their slogan is, "The Pinkest Party on Earth," and that might be accurate. Not only is the 10-day festival full of events such as concerts and parades, but you'll see almost everyone wearing pink. People even dye their dogs pink for the festival!

The cherry trees came through in full force this year, in perfect timing for the festival. The cherry tree in my backyard is looking its finest, as well. I decided in honor of the festival, and to celebrate the arrival of spring, I wanted a pink container garden for my patio. It didn't take long to run to Lowe's and put one together this weekend.


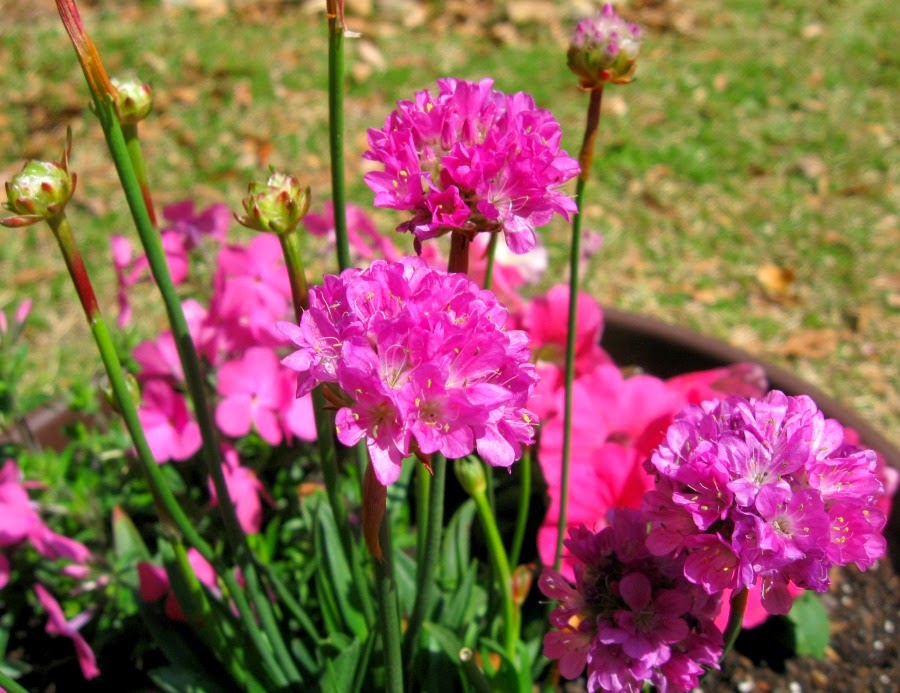
I picked three plants that I thought would give me the most bang for my buck: armeria, phlox, and petunias.

Armeria
Armeria is also known as thrift or sea pink. This perennial blooms spring and early summer, and can also be found in white or red. If you didn't guess from the name, it's native to coastal areas. It likes full sun and well-drained soil and is fairly drought tolerant. Even when it stops blooming, I think its grass-like foliage will be lovely in this container.

Phlox
There are several different species of phlox, but I loved the large blooms on this one. It's also a perennial, like armeria. It only blooms in spring, but I can plant it in my garden when it's done blooming. It likes full sun and regular water.

Petunia
When the phlox stops blooming, the petunias will fill in. These annuals are easy to grow, grow fast, and bloom all summer. They do best with regular water, but they'll survive a little neglect. I expect to see them spilling over the sides of my container in June. They don't tolerate frost, but I don't mind dragging the pot inside if we get a couple more frosty nights.

Happy gardening!

Thursday, March 20, 2014

Pruning 101

When you have a nice Saturday afternoon, you may, like me, have the itch to get out and plant flowers, vegetables, and more. Unfortunately, it's still too early to plant tomatoes, petunias, and those other heat-loving plants we all love, but it's the perfect time to get out and prune.

There is a right way and a wrong way to prune. I see so many beautiful trees and shrubs ruined by bad pruning--even pruning done by well-meaning "landscape" companies! Good pruning makes your trees and shrubs both more beautiful and more healthy in the long term. It may take a little longer, but it doesn't have to be complicated. The reward is worth it. I'll show you how!

First: The Tools
I have three tools I use for all my pruning. I could probably use a couple more, but these three serve me just fine 95% of the time.

My favorite pruning tools, from left to right: bypass hand
pruners, loppers, and folding saw

Most of the time, I use hand pruners (Felco 2, to be exact) to cut small branches. For larger branches, or branches slightly out of reach, I use loppers. Because I have some older trees and shrubs in my yard, I use my folding saw from time to time to cut large limbs (and small trunks) that are dead or diseased.

Now I admit, I don't really like the formal look in my garden. If that's what you want, your main tool will be hedge shears.

Whatever you're using, you'll want to make sure they're sharp and in good condition. Not only do dull tools make your job more difficult, but good, clean cuts are important for the health of your plant. When you get tears or ragged cuts, those invite disease and infection to your plant. Clean cuts will heal faster and keep disease out. Here's a handy video about sharpening your pruners if they've gotten dull.

Where to Cut
If you like the formal look, it's fairly simple: shear your shrub to the shape you want. You just want to make sure the final shape is slightly wider at the bottom. If it's not, the lower branches can get shaded out by the upper branches and die off. If your shrub does get a dead branch, you'll use hand pruners or loppers to remove it.

If you want the more natural look, you'll use a combination of "thinning" cuts and "heading" cuts.

Thinning cuts involve removing a whole branch back to its origin. Thinning cuts are good for the health of your shrub because they let more light into the canopy. Thinning cuts are especially good for removing crossing branches. Not only are crossing branches less aesthetically pleasing, but they can rub against each other and cause wounds which make way for disease.

A thinning cut: removing a whole branch

Heading cuts have two purposes: 1) they make branches shorter and 2) they make plants branch out more and become bushier (get it? "bushier?"). To make a heading cut, you cut the tip of a branch back to right above a node. A "node" is where a leaf grows out of a branch. When you cut the branch back, it's also where a new branch will grow out. Most of the time, a new branch will grow in whichever direction that node/leaf is facing. If possible, you'll want to cut back to a node that is facing outward, not inward, for a healthier, more attractive plant.

The best branches to make heading cuts on are branches that are too long (sticking out) or where there's a hole in your shrub. A heading cut will cause a plant to branch out, filling in the hole in the overall shape. Of course, if your plant already has a mostly even shape, you can still use heading cuts evenly spaced around the shrub to get a denser look (or, for flowering shrubs, to get more flowers).

A heading cut: making a branch shorter 

When to Prune
As I mentioned, March is a great time to prune, but it's not the only time you can prune. For your regular, green, non-flowering trees and shrubs, you can pretty much prune from January through August. Fall is a bad time for pruning because pruning can cause a sudden flush of new growth, which is easily damaged by an early frost.

For your spring-flowering trees and shrubs, such as azaleas, camellias, dogwood, forsythia, and cherry trees, now is actually a terrible time to prune. You should wait until May or June (after they flower) to do any significant pruning. If not, you'll be pruning off the flower buds, and it will take them another year to grow more buds.

For your summer-flowering trees and shrubs, such as hydrangeas, gardenias, crape myrtles, and magnolias, it's fine to prune in the springtime.

As for roses...whole books could be written on the subject of pruning roses. (Someone actually wrote one, as a matter of fact.) Typically roses are given a good hard pruning in February, leaving 3 to 5 main canes (branches) that are cut back to 2 feet tall. All the smaller branches are removed. Then, as roses bloom, the dead blooms are cut off to encourage the plant to keep blooming. For the ubiquitous 'Knockout' roses, this isn't really necessary--they'll keep blooming anyway--but I think they look nicer if you remove all the old dead flower parts from time to time.

Have fun pruning, and feel free to leave a comment below if you have any questions about pruning your shrub.

Tuesday, February 25, 2014

Plant of the month: Camellia

One of the underrated gems of the Southern garden is the camellia. Camellias are like roses that bloom in winter. The flowers come in every shade from red to white, and in every size from a ping-pong ball to a softball.

Just a few of the camellias currently blooming in and
around my garden

There are so many different varieties that a whole organization, the American Camellia Society, is devoted to them. Their headquarters at Massee Lane Gardens are located not far from here, in Fort Valley, GA. If you visit Massee Lane, you can see over a thousand different varieties of camellias on display.

Historic marker in Third Street Park in downtown Macon,
where the first public camellia show was held

Even though the headquarters are in Fort Valley, the American Camellia Society was actually founded here in Macon. We live just a few blocks from where Dr. William G. Lee, one of the founders of the ACS, once lived. His estate, now a public park, is another hidden gem with lovely trails among the old camellias. If you're in Macon and want to visit, just head to the north end of Glenridge Drive. It's a short street, so it's not hard to find.


In our side yard between our property and our neighbor's, there are 8 different varieties of camellias. Since our own home was built in the 1920s, I wonder how old the camellias are. Perhaps they were purchased at an ACS camellia show in the 1930s, or maybe they were even gifts from Dr. Lee! It's just as possible that they were planted in the 1980s, but it's fun to dream.

Depending on the species and variety, camellias will bloom anytime from October through April. They are evergreen, so their dark green, glossy leaves look beautiful all year. There are two main species of camellias grown in the landscape: Camellia japonica and Camellia sasanqua. As a general rule, Camellia japonica varieties have larger leaves and blooms, compared with Camellia sasanqua (sometimes called "sasanquas" for short). Sasanquas usually bloom earlier, in fall and winter, while Camellia japonica varieties bloom more in winter and spring.

Whichever species and variety you decide on, here are some facts to help you care for your camellias:

Sun: Camellias thrive in light shade and look their best when protected from hot afternoon sun. Sasanquas will tolerate more sun.
Soil: They prefer a well-drained spot, rich in organic matter, with slightly acid soil.
Water: Give camellias regular water for several months after they're planted. Once established, they rarely need to be watered, except perhaps during a summer drought.
Pruning: If you'd like to prune to improve the shape of your camellia, do so immediately after they bloom.
Fertilizer: They don't like to be heavily fertilized, but if they're looking like they could use a boost, pick up an azalea fertilizer--it contains the acid that camellias like.
Other: A layer of mulch will keep your camellia roots cool and happy. If your flowers are turning brown and falling off, be sure to clean them up. It's a sign of a fungal disease that will continue to spread if you leave the diseased blooms on the ground. Some bud drop (when buds fall off before they bloom) is normal for camellias, so don't panic if you notice it in your camellias.

Wednesday, February 5, 2014

How to Start Seeds Indoors

After crazy cold weather through most of January, February seems to have warmed up for now, giving me hope that spring will, indeed, come. I spent most of January coping with indoor gardening projects. My mother gave me a terrarium for Christmas so I would have a little tiny jungle to enjoy in the cold of winter. It took me a while to get the water balance right, but I think it's finally stabilizing. I bought some flowers to brighten up my home, too. I just couldn't resist the little tiny purple irises at the grocery store. I put them in my own pot, and added some moss, and they make my living room feel like spring.

Iris reticulata

Now is the perfect time to start thinking about your summer vegetable garden. If you want to save a little money and get the best possible harvest from your garden, you should consider starting your vegetable plants from seed indoors. I admit, I shied away from growing plants from seed in the past. My few attempts never worked out well, and I didn't have the patience. After doing some research, though, I've decided to give it a try again this year for a few reasons:
  • Vegetable plants from the garden center are much more expensive than seeds.
  • When you grow plants from seed, you have many more choices, so you can choose varieties that are better suited to your garden, more disease resistant, tastier, or just more fun.
  • Growing your own plants means you can control how they're grown, especially if growing organically is important to you.
  • Homegrown plants are likely to adjust to your garden more quickly than plants that have been grown 500 miles away, traveled in a truck, and sat in a store for weeks.
  • I've figured out a few "tricks" that aren't hard and will increase my chances of success (and yes, I plan on sharing them with you).

I planted parsley seeds last month, and they've
sprouted nicely.
So, do I have you convinced to try growing your own plants from seed? If you're ready to experiment with starting seeds indoors, I'm ready to share everything I know so far. I'll report back in a couple of months and let you know if it worked. If you are growing seeds indoors for the first time, I'd love it if you would let me know how it worked for you, and we can compare notes! So, step by step, here it goes:

1. Buy good seeds. For a single pepper or tomato, there are many varieties to choose from. For example, I was recently looking at plum tomatoes because they make the best sauce. If you go to Burpee's website, you'll find eleven varieties of plum tomato alone! If you go to other companies, they will have some of the same varieties, but also other ones. Each variety has different features. I usually look for varieties that are naturally resistant to diseases, so I won't have to spend as much time fighting fungus or plant viruses in my garden. If you go to Johnny's Seeds and look at the 'Granadero' tomato, for example, you'll see it's resistant to Tomato Spotted Wilt Virus, nematodes, and blossom end rot. 

You can also choose varieties of vegetables that are more compact (if you have a very small garden), are more heat tolerant, produce more fruit, bear fruit faster, bear fruit longer, or are different colors and shapes, depending on what you like. For the more environmentally conscious, there are many organic and heirloom seeds available. Whatever variety you choose, make sure you choose a reputable seed company--their seeds are more likely to be healthy, viable and disease-free. In addition to Johnny's and Burpee, I also recommend checking out Seeds of Change (all of their seeds are organically grown), and Baker Creek Heirloom Seeds (all heirloom varieties). One more note about shopping for seeds: the earlier you shop, the better your selection. Popular varieties will sell out fast.

A note of warning: not all plants like to be started from seed indoors and transplanted later. A few that do well include peppers, tomatoes, eggplant, and squash.

2. Buy something to grow your seeds in. First, you'll need a container. I bought a 72-cell seed starter tray (also known as a "flat") that came with a tray for water drainage, and a dome to keep the moisture in (see below). You could probably use just about anything as long as it's sterile. Seed starter trays are nice because you can grow many plants in a small space. Also, because they have their individual compartments, the plants are easier to transplant without disturbing the young roots. If you choose to reuse a pot that you've used previously, sterilize it first (a mild bleach solution works well) to kill any remaining plant diseases.

72-cell flat with dome to seal in moisture and tray to collect water
drainage (left), seedstarting mix (right)

After you have your container, you'll need your "dirt." I recommend planting seeds in specific germinating or seedstarting mix. Seedstarting mix, unlike potting soil or garden soil, has the perfect balance of water retention and drainage, is disease-free, and has the right level of nutrients for your young seedlings. I'm experimenting with organic gardening more this year, so I chose an organic seedstarting mix from Gardener's Supply.

3. Find a warm, sunny place. Warm-weather veggies such as tomatoes and peppers need soil temperatures of 70-85 degrees to germinate! If you have a warm spot in your house, like next to an appliance, that would be ideal for starting your seeds. If not, you can buy a heat mat designed for just this purpose. It's a little pricey, but I think it's worth the investment. You can use it for years, and it greatly extends your growing season. I got mine off of Amazon, and it's the perfect size for my seed tray.

Every plant is different, but as a general rule seeds prefer the dark while they're germinating. After they sprout, they'll need a sunny spot next to a window.

4. Get planting...at the right time.  Each type of plant has its own growth rate. Some seeds germinate in a matter of days, others can take three weeks or more. Even after they germinate, some plants grow faster than others. Tomatoes and peppers can be started inside about six weeks before your last frost date. (If you don't know your average last frost date, you can look it up here.) Squash and cucumbers, since they grow so fast, are started only two weeks before your last frost date.

Once you figure out when your seeds need to be planted, you're ready to plant. Here are your six steps, as illustrated below:
     1) Add soil to your container.
     2) Lightly press the soil down into the container with your finger, and add more soil if needed.
     3) Moisten the soil with lukewarm water (a spray bottle works well).
     4) Create a hole for your seeds using an old pencil. (Check the back of your seed packet to see how deep your seeds like to be planted.)
     5) Add your seeds to the hole.
     6) Lightly cover up your seeds with a sprinkle of soil after planting.


5. Don't expect perfection. A friend told me a story once that she and her husband had a little competition. They each planted one seed in a pot and waited to see whose plant would grow faster. Neither seed germinated, and they gave up. It made me laugh. All other things aside, not every seed in a seed packet will germinate. While some plants have a natural germination rate of 99%, others may only have a germination rate of 60%. Out of the ones that germinate, some may be stronger, while others may be weaker. A small percentage of seedlings will probably die, even under the best of circumstances. Know that that's normal, and plant a few extra seeds to be on the safe side.

6. Give your seeds an even supply of water. Seedlings need constant moisture. While most plants in your garden probably like to dry out a little between waterings, seedlings don't. It's harder to give them too much water, but it's easy to give them too little. Seedlings aren't very sturdy, either, so a normal hose or watering can will beat up your tiny little sprouts. If you have a water-tight tray, you can water your seedlings from the bottom, by leaving them in the tray with a layer of water to soak up. Right now I find it easiest to mist them very gently with a spray bottle every day, focusing on the soil, not the plant.

That's it! Every plant is different, of course, but if you follow those guidelines you should be able to successfully grow some of your more common vegetables and herbs from seed. Good luck, and let me know how it works for you!

Wednesday, January 29, 2014

Snow in a Southern Garden

Here in the Deep South, we don't get snow every year. When we do, it's usually less than an inch. So when we got three inches of snow last night, it was quite a big deal. It started after dark and continued well into the night. I was so excited when I woke up this morning, I felt like a kid on Christmas morning--except instead of presents from Santa, I got snow! I woke up early in anticipation of the winter wonderland that would I find outside my window, and waited anxiously for my husband to wake up so we could go outside and walk in the snow together. I took a few pictures to share with y'all. Enjoy!


Our house covered in snow
Our backyard
Up close, snow looks like miniature sculptures.

No birds using our birdbaths today.

Water droplets freeze on the tips of camellia leaves.
Camellias don't mind occasional snow.
The irises don't seem to mind the snow, either.
Onions are the only thing left growing in my square-foot
garden after all the cold.
I think holly bushes look loveliest with a fresh coat of snow.

Leyland cypress

Evidence of a nighttime visitor.