Tuesday, December 17, 2013

Vegetable Garden: December Update

I should be thinking about Christmas cards and Christmas presents, but all I really want to do this week is spend time in my garden. I decided earlier this fall that I wanted to try a cool-weather vegetable garden this year. I stocked up on seeds, read all I could, and got to work in September. August just seemed too hot to be planting cold-weather vegetables.

In September I planted salad greens, broccoli, and carrots from seed, and cauliflower from seedlings I bought at the hardware store. In October I planted radishes and spinach from seed, and red onions from sets (little baby onion bulbs).

Some of the salad greens in the first planting got washed away and/or dug up by the squirrels, so I planted more seeds a few weeks later. The first planting has produced some tasty, tender baby greens, but the second planting still just looks like little tiny seedlings. It turns out early September was the perfect time to be planting lettuce.
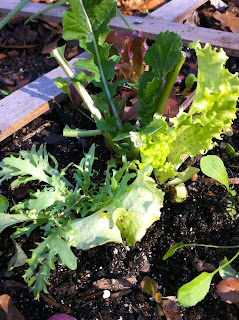
Mixed salad greens in my garden

The broccoli seeds I planted in the garden didn't sprout at all. I read that broccoli grows much better when it's started as seedlings and then moved into the garden, so I made a later, half-hearted attempt to grow broccoli seedlings inside in vermiculite. They sprouted, but after a month of sitting on my windowsill, they still weren't very big. I got impatient and tried moving them into the garden, but they were fragile and snapped. Next year I'll try planting broccoli seeds inside in late summer, when the house is warmer, and use a different medium, and maybe I'll have some transplants ready to go in the garden by September.

The first planting of carrots died from lack of water when I was sick one warm, dry week in fall. I planted more in October, and they've stayed about an inch tall for the last month.

The cauliflower has been an epic failure, but I've learned a lot. First I fought off the cabbage worms, then I thought I had deer eating my plants. It turns out it wasn't deer--my last remaining cauliflower plant got eaten in spite of having a cage over it. Based on my research, it's probably cute little bunny rabbits that slipped in through the 4-inch gap under my cage, but I have yet to actually see rabbits in my yard. So it's still sort of a mystery. But next year I'll build a better cage.

The radishes look healthy, but also haven't gotten very big in this cold weather. I should have planted in September. They're surviving the cold, but if I get any radishes to eat, it won't be until February at this rate.

Spinach seedlings in my garden

I accidentally planted onions on top of my spinach seeds because I forgot where I planted them. I planted some more spinach seeds in early November, and they continue to grow slowly but surely, despite the squirrels digging them up every other day with their incessant digging for acorns. I think if I had planted in late September, I would have had a nice crop by now. As it is, I might get some spinach in February.

The red onions look beautiful. They're sturdy enough that the squirrels don't bother them. I actually did a second planting in early November, and they're smaller, but just as happy as the October planting. It takes about 14 weeks on average for onion sets to mature, and it will probably take a little longer as a winter crop. I expect to enjoy nice, fat onions in late winter to early spring.

My red onions don't mind a little cold.
Despite the setbacks, so far my cold-weather garden has been totally worth it. I won't get a huge harvest this year, but I know exactly what I need to do differently next year: plant earlier, water (almost) daily when the weather's warm, keep the insecticidal soap on hand, and build some really sturdy cages to keep out the cute, fluffy rodents. See? It's simple. :)

Wednesday, December 4, 2013

Christmas Gifts for Gardeners

I've always struggled with shopping for gifts. I just don't spend that much time shopping in general--for me or anyone else--so I don't know what's out there. Plus, if you're shopping for that favorite family member with entirely different interests from you, it's hard to predict what they'll love and what they'll hate. So, if you have a friend or family member who loves gardening, I'm here to help! That's the one thing I do know how to shop for. In no particular order, here are some Christmas gifts to please a range of gardeners in your life:

1. Amaryllis. This bulb makes a great gift for your favorite hostess or grandmother. You can buy them in a variety of lovely containers and in colors ranging from white to red. They're easy to grow indoors, and if you get one that's barely sprouting at Christmas, it will be in full bloom in January when gardeners like me get depressed at the lack of greenery. If they live in the South, the bulbs may be planted in the garden after they've finished blooming indoors. Jackson and Perkins is a great resource for amaryllis gift sets. You can also check your local florist or garden center for these.

Single Stardust Amaryllis from jacksonandperkins.com
2. Gift card for seeds. For your favorite vegetable gardener, get them a gift card to a seed company like Seeds for Change or Burpee. They'll have great fun pouring over the seed catalog trying to decide how to spend their gift card in preparation for spring. Seed companies carry so many varieties that you won't see at Home Depot or Lowe's. ("Do I want red peppers or purple peppers?") Your friend or family member will be thinking about your thoughtful gift when the seeds sprout in the spring and when they're harvesting the produce in the summer.

3. The finest watering can money can buy. My mother had a beautiful blue watering can that started rusting and peeling with time. After some research, I replaced it with a Haws watering can. Haws has put a lot of thought and care into creating watering cans that do the best possible job of getting water to your plants without disturbing the soil or foliage. They offer several styles based on your needs and a range of colors based on your tastes. There are several companies that sell Haws watering cans, so feel free to shop around for the best deal.

Haws watering can from williams-sonoma.com
4. Tools. If you use your garden tools with any frequency, they usually need to be replaced after a few years. Metal tools get dull and rusty from use, and plastic tools get brittle and snap from being in the outdoors. Chances are, your gardener friend could use some replacements for their most frequently used tools. You can pick up cheap plastic trowels and cultivators at the hardware store that make great stocking stuffers, or splurge on fancy wood-and-metal tools with a "lifetime guarantee". If you want to get them a pair of hand pruners that will be their best friend, you can get them a Felco 2. Or, you can get them a useful tool that they might not already have, like a pair of snips for cutting flowers and vegetables or a dibble for planting bulbs.

Garden tools, from left to right: hand cultivator, hand
trowel, hand pruners, snips, transplanting trowel.
Image from from doityourself.com.
5. Plant markers. Earlier this year I had a mix-up where I planted onions on top of spinach because I forgot where I planted my spinach! Even if you're not working with seeds, plant markers are a fun way to label your herb plants or keep track of the names of your roses. Plant markers range from the boring to the artistic. For the serious gardener, I'd suggest metal plant markers that you can write the names on and will last forever. Make sure you get ones that are rust-proof, or they won't last for more than a few months. If you're looking for something more whimsical, you might check out these colorful herb markers I saw on Etsy.

Plant markers by fromArtisanHands on Etsy.com
Have a lovely Christmas season!

Thursday, November 21, 2013

Deer Are Cute...Until They're Not


This was the sight that greeted me when I checked on my vegetable garden this morning. That plant with one leaf at the bottom of the picture is a cauliflower plant. Those empty blocks behind it used to contain cauliflower plants. Beautiful, lush cauliflower plants that I had babied and coddled for the last month. Apparently I didn't coddle them enough.

This is what my cauliflower looked like
last week. Now they're gone.

I can only assume that the deer took my cauliflower from me in the cover of night. What else would eat a whole plant, thick stem and all, right down to the ground? I used to love watching the deer. From my living room, I could see them grazing on the weeds in our back lawn when I worked at home. I felt like Snow White living among the cute, fuzzy animals. Other than losing one bean plant in the spring, they hadn't touched the vegetable garden in months. Now, I have one cauliflower plant left. It's really kind of heartbreaking. If I'm lucky, I might get one crown of cauliflower for all my work. Clearly, Snow White never had a vegetable garden.

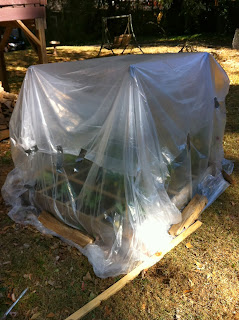
You better believe I'm caging my garden now. I built the cage in the spring originally to keep the deer out and to keep the squirrels from digging among my seedlings and disturbing them. When the plants grew too large for the cage, I left it off, and the deer really left my garden alone. When the freeze came last week, I put up a PVC frame with plastic sheeting to protect the cauliflower from frost, and when the plastic came off, I left the frame up for ease of covering when the next freeze hits this weekend. Apparently, I need to remove the frame and replace it with the cage in between freezes. That last cauliflower plant will stay covered at all times.

For now, my last cauliflower plant lives safely under a cage.

The moral of the story: if you have deer in your neighborhood, don't ever let your guard down, especially in the winter time when their natural food supply is more scarce. My cage works fine for my little garden, but I'm not sure what people with larger gardens do. I never had these issues growing up in suburban south Florida. Do you have any suggestions?

Monday, November 18, 2013

What to Do When Your Garden Freezes

The weather has been crazy this month. The temperature this afternoon was 84 degrees. Just last week, we reached a record low for November 14 in Macon: 21 degrees.

Fortunately, I was prepared for the freeze. My husband and I bought more sturdy supplies to cover the vegetable garden. (Our last cover involved bamboo stakes and duct tape.) We created a frame using two 10-foot, 1/2"-diameter PVC pipes and covered it with a 6 mm-thick plastic drop cloth. It didn't keep the summer vegetables (or zinnias) from meeting their inevitable demise, but the fall vegetables were quite happy with the arrangement.

My vegetable garden with PVC framing
for cold protection the day aft
er the first
freeze
The freeze killed all the peppers.
The fall vegetables are loving the cooler temperatures.
Clockwise from top left: onions, lettuce, radish, and
cauliflower
 As for the rest of my garden, the ornamentals had a mixed response. Growing up in south Florida, temperatures just don't ever get to 21 degrees, so I still look at freezing temperatures like a fun science experiment. Like any good science experiment, I carefully documented the results. My hydrangeas looked dead the next day. Fortunately, I know they're cold hardy, so I expect they'll look fine come spring. My hostas also took the cue to start winding down for the winter. My roses didn't notice the difference. Both the rose blooms and leaves looked exactly the same as they had the day before. The pansies, too, were unfazed by the cold.

The hydrangea leaves wilted and blackened from the
freeze. The roses and pansies were unaffected.
With some plants still thriving and others dying back for the winter, you may wonder what you should be doing right now in your garden. The combination of sudden cold snaps and surprisingly warm weather confuses plants and people alike. Here are a few tips for caring for your plants in November:

1. Resist the urge to prune shrubs. You might want to jump in and trim back your pathetic-looking hydrangeas (or other shrubs), but the best thing you can do is leave them alone. Pruning signals to plants that they should branch out, and especially in the warmer weather they are likely to put out a bunch of new growth. Even if a plant is cold-hardy, all that tender new growth will be easily damaged when the next freeze hits. Wait until late in winter, when the plants are good and dormant, to do most of your pruning.

2. Resist the urge to fertilize...almost everything. Just like with pruning, fertilizing encourages tender new growth, which can be damaged by a freeze. Your plants need to be sleeping, not growing. Here in zone 8, we have some exceptions. All of your winter annuals, such as pansies, snapdragons, and ornamental kale, should be kept on a regular feeding schedule to maximize their blooms. They will continue growing quite happily through the winter. Your cold weather vegetables, too, can be fertilized as needed.

3. Plant or transplant shrubs. This is a good time to plant roses, blueberries, azaleas, and other shrubs. The cooler weather gives the roots plenty of time to get established before the summer heat hits. (Even when plants are bare and dormant, their roots are still growing.) This is also a good time to move plants to a new location. One of my hydrangeas looked unhappy every afternoon this summer, so I'll probably dig it up and move it to a shadier location in the next couple of weeks.

4. Keep watering. Just because plants are dormant doesn't mean they don't need water. The harsh wind, especially, can dry plants out fast. They don't need to be watered as often as they do in the summer, but if we go through a dry spell, throw a little water on your sleeping shrubs. If you just planted shrubs, they need  frequent water. If your pansies look wilted after a freeze, throw some water on them and they'll perk right up.

5. Rake leaves. As I mentioned in my post on fungus, fallen leaves make the perfect place for plant diseases to hibernate until they return in the winter. For the health of your plants, you should rake up the leaves and either compost them or haul them to the curb.

Happy gardening!

Tuesday, November 5, 2013

One Year in My Garden

Fall came early this year. My oakleaf hydrangeas and dogwoods developed some lovely fall hues that weren't there when I took pictures and started my blog around this time last year. We also got an early frost a couple of weeks ago. It snuck up on me, so my husband and I found ourselves at Walmart at eleven o'clock on a Friday night buying drop cloths and duct tape to rig together some quick protection for my vegetables. It actually turned out pretty well, considering my husband put it together at midnight while I held the flashlight for him, shivering in the cold. Here's a picture I snapped the next morning:

We assembled protection from the cold for
my tender vegetable plants from bamboo
stakes, drop cloths, and duct tape.
I have been enjoying this beautiful weather, tackling lots of little projects around my garden. I planted a tiny rose plant I bought from a farmers market for $3, some leftover pansies a friend gave me, red onion sets I picked up on an impulse at Home Depot, and some parsley seeds I'd been wanting to try. I think I accidentally planted onions on top of the spinach because there's something sprouting up all around the onions, and not in the square next to it where I thought I had planted spinach. (Note to self: always label my squares when I plant seeds instead of depending on my faulty memory.) I moved some dying irises to another bed where I thought they would be happier, and replanted broccoli seeds indoors after they failed to sprout outdoors last month.

I planted irises, pansies, and a rose over the weekend.
It's hard to believe I've been working in my little garden (and blogging about it) for over a year. For how little time and money I've actually spent on it, I'm pretty proud of the progress. A year ago, some of my plants were just 4" cuttings given to me by a friend, and they've grown into small shrubs. The bareroot roses I won in a contest looked like sticks when they arrived, but they really filled out and bloomed well this year. I added new flower beds and vegetable beds in areas that were just lawn a year ago. It's not the kind of transformation you see on HGTV, but I haven't spent thousands of dollars on plants and labor, either. None of the plants are looking their best this time of year, but I wanted to take pictures anyway, to track the change from when I started. 

My yard, October 2012

My yard, October 2013

Here's a summary of what I've done to my garden in the past year:

  • Removed all of the Indian hawthorn shrubs from the front of the house, and half from the back of the house
  • Planted a cottage-garden-style border on the east side of the front door, and half of the border on the west side
  • Added a small flower bed next to the sidewalk
  • Cleared out some of the ivy next to the patio and planted a shade border
  • Added a vegetable garden in a raised bed

There's an adage about new gardens that says plants sleep the first year after they're planted, creep the second year, and leap the third year. They put a lot of energy the first year into just getting established and growing their root system. I think that was somewhat true for my garden. I did enjoy some lovely blooms, but my plants seemed to spend most of their energy just filling out and growing new leaves. I can't wait to see how my garden blooms this next spring.

In the next year, my attention will shift to updating the beds behind the house and creating new beds in the back of the yard, which is mostly lawn and weeds right now. Here are a few spots I hope to improve:

I have made some improvements to the bed
next to my patio, but it still has a long way
to go.

The very back of our yard is a large stretch of weedy
lawn and untapped potential.
Gardening requires a lot of patience. Some people put their creative energy into developing an artistic talent, others into remodeling or decorating their home. For me, my masterpiece will be my garden, and in a few years, all the sweat and waiting will be worth it.

Thursday, October 17, 2013

Lessons from My Vegetable Garden

I can't believe it's been almost a month since I last posted! Between working non-stop and fighting a cold, I could barely get in the garden long enough to water my plants. When I finally recovered, my little vegetable garden was a sad sight. My broccoli seeds had never sprouted. ALL my carrot seedlings had shriveled up and died because I missed a few days of watering them. My block of lettuce seeds looked like they had either been dug up, washed away, or both. The cabbageworms, which I thought I had under control, had multiplied and skeletonized my newest cauliflower transplant. To make matters worse, the cabbageworms managed to do that much damage while still being so tiny that I could barely see them with the naked eye.

New additions to my fall garden:
radishes and spinach

After my mourning period was over, I got to work. I broke out my environmentally-friendly pesticides and killed all the cabbageworms. I realized I still had plenty of time to replant the veggies that didn't make it (and plenty of seeds left in the packets), so I replanted my block of carrots and added to my sad little block of salad greens. While I was at it, I pulled out the okra (it only produced one single, solitary okra in the last 6 months) and planted radishes. Where the broccoli didn't sprout, I sowed spinach. The broccoli was kind of an experiment anyway: I had read it grows better from transplants than directly from seed. I'll try sowing some indoors in the next week and transplanting it outside later on.

Butterflies and moths love my hot pink zinnias.

One thing in my vegetable garden that seems quite happy right now is my zinnia. I planted it so I could enjoy the cut flowers inside, but it's also been a welcome bright spot among the veggies. I particularly enjoyed watching the butterflies on it while I worked in the garden this week.

Gardening is filled with life lessons. I admit it: when I first saw my dead carrots, disappearing lettuce, and chewed-up cauliflower plants, I wanted to give up altogether on my fall vegetable garden. I don't take failure well, and sometimes it's easier to give up than to try again. But life is full of setbacks. Things don't always go like I plan. Sometimes the pests are determined to destroy all my hard work. But in life, as in gardening, sometimes the best way to learn is through trial and error. After all, I started this blog one year ago just for that purpose: so I could keep track of what I did in my garden and learn from my successes AND failures. If I hadn't tried planting my first fall vegetable garden, I wouldn't have learned the dangers of cabbageworms, the necessity of daily watering in the fall, or that broccoli seeds need to be started inside. And if I hadn't tried again, I wouldn't have sat beside my vegetable garden long enough to watch the butterflies dance among the zinnias. Maybe God lets us experience setbacks so we will learn and grow, or maybe just so we'll slow down long enough to appreciate the little things.

So, if you think you have a "brown thumb," just remember: 1) even experienced gardeners lose a crop sometimes, 2) gardening and life are all about trial and error, and 3) celebrate the little moments of beauty that make it all worth it.

Happy gardening!

Friday, September 20, 2013

Know Your Pest: Cross-Striped Cabbageworm

It's been such a busy week between work and catching up on projects around the house, I haven't been able to do as much gardening as I would have liked. Even when I have been in the garden, most of the time has been spent watering. (The nice breezes and lack of rain dry plants out fast.) I did spend some time removing ivy and weeds from the hosta bed next to my patio, and even discovered a couple of surprises in the process.

My little garden friend can stay and eat all the
bugs he wants.
This little toad wasn't too happy with me cleaning out some of his great hiding spots, but there were still plenty of hostas for him to hide among when I was done.

Surprise camellia seedlings
I also discovered that some seeds dropped by the large camellia shrub nearby had sprouted in the hosta bed. I carefully extracted three of them and potted them up. I'm curious to see if they look like the parent, or if they come out a little different. Either way, I'll be happy; they have a great parent plant. I've never grown camellia seedlings before, so I'll be happy if two out of three live. Then I can keep one, and give one to a friend.

I've been spoiled by my garden being relatively pest-free all summer, but this week I encountered a nasty pest on my young cauliflower plants: the cross-striped cabbageworm. There are a few kinds of cabbage moths, and even though their name says "cabbage," they all affect various members of the cabbage family: broccoli, cauliflower, Brussels sprouts, collard greens, kale, and, of course, cabbage. This little guy really likes the mild fall and winter of the South, but can be found throughout the U.S. For being so small, the caterpillars can really do a lot of damage fast.

My young cauliflower plant defoliated by cabbageworms

I planted my cauliflower seedlings just two weeks ago, and when I went out to water this morning, I saw the damage. I had seen a couple of holes before, but didn't really think I had a problem until I saw half my plant was gone. Closer inspection revealed the tiny, hungry culprits hiding in the very center of the plant and on the undersides of leaves.

Here's a very close-up shot of the cross-striped
cabbageworms.
Unlike the tomato hornworms that get big and fat, these guys never get bigger than an inch long. If you don't look carefully, they can go through a whole life cycle before you ever see them. In warm weather like we've been having, they can go from egg to moth in 18 days, devouring your vegetables in the process.

Since I only have a few plants in the cabbage family right now, and the plants are small, it was easy to find all the worms and pick them off with my hands (wearing gloves, of course). Now that I know they're an issue, I'll inspect every couple of days while I'm watering the garden and remove them as I see them. If they continue to be a problem, especially as I get closer to having little baby heads of cauliflower, I might spray with an insecticidal soap as an extra measure. Any insecticide product that's labeled for caterpillars can handle these.

What's growing in your garden this week?

Thursday, September 12, 2013

Signs of Autumn in the Garden

I love autumn, but fall in the South is weird. Down here in zone 8, fall temperatures are short-lived and easily punctuated by hot spells or cold snaps. We don't really get the glorious displays of fall color that you find farther north. This September has been a perfect example--while you expect summer to be coming to an end, we've had some of the hottest weather all year. (At the local farmer's market, one grower was lamenting that they finally got their first good tomato crop for the year just this month.)

Most of the leaves have fallen from our
cherry tree.
In spite of the crazy temperatures, there are still signs of fall beyond Pumpkin Spice Lattes at Starbucks. Due to the shot-hole fungus, my cherry tree defoliated early, and I found myself this past weekend doing a typical fall chore: raking leaves. As I mentioned in my post on fungus, raking up all those disease-ridden leaves can help keep the disease from returning next year. Otherwise, the fungus just continues to live and breed in the dead leaves.

Lycoris radiata (Red spider lily) blooms in the field out
back.
The first of the red spider lilies (Lycoris radiata) just started blooming out back, which is a sure sign that summer is coming to an end. These lilies are native to China, but they naturalize quite readily in the South. They were originally introduced in the U.S. in 1854. Who knows how long ago they were planted under the dogwood tree in our backyard--they continue to spread every year. The flowers appear like magic out of the ground, without any leaves, in a great big mass in late summer or fall. They almost grow in reverse from most bulbs: after the flowers fade, then the leaves follow, growing through fall and winter until they disappear in early spring. The bulbs are actually dormant in summertime.

My white chrysanthemum looks small now, but it will fill
its pot soon.
The ubiquitous, fall-flowering Chrysanthemum ("mum" for short) is available in all the garden centers this month. I'm not a huge fan of mums--perhaps because they're everywhere, or because I don't like most of the color choices. I have to admit, though, that there are so many different varieties out there, that I actually liked a couple of the ones I saw in a recent trip to Lowe's. Also, mums are such a symbol of fall, that I decided I needed one in my garden. I settled on this creamy-white variety. I'm all about saving money in the garden, so instead of buying one of those large mums they'll be selling soon in decorative containers for $10, I bought this little guy (who's not quite in bloom yet) for $2. In the end, he'll probably be happier and healthier. Tip: When buying flowering plants, look for plants with healthy leaves and lots of buds that aren't in flower yet. Younger plants will adjust more readily to your garden than fully mature plants.

Sometimes you just have to take time to notice the little details of the season. What signs of fall do you see this week?

Thursday, September 5, 2013

Planting a Fall Vegetable Garden

In my checklist for August, I mentioned several fall vegetables you could be planting in August. But if you're like me, you probably looked outside every day and thought to yourself, "It's too hot for a fall garden." Honestly, I've read a couple of different sources about when to plant what--some say August, some say September, depending on the vegetable. Well, on Labor Day I decided fall has officially started by some definitions (even if it is 90 degrees outside here in Georgia), so I would start on my fall vegetables. Since this is my first year at a real attempt at a vegetable garden, it's still all one grand experiment for me. I started by going to Lowe's and seeing what I could find.

Some of the seeds I picked up include Mesclun Salad Mix, 'Early Green'
broccoli, and 'Red Core Chantenay' carrots. I also bought cauliflower
seedlings to get a head start.

They didn't have much that I wanted in the way of other seedlings, but the cauliflower seedlings looked appealing. Then I headed to the seed rack. The Seeds of Change rack was calling to me--all organic seeds, with many heirloom varieties, and they only cost a little bit more than the conventional seeds. I love the idea of heirloom plants--varieties that have been passed down through generations, grown by farmers who came before us 80 or 800 years ago. I picked up a handful of seed packets that promised me a tasty, organic harvest.

The next step was cleaning out my garden. I wasn't quite ready to pull up all my summer vegetables. After all, some of them were actually producing more now than they had been all summer! The sun has moved, so my vegetable bed is getting more sunshine, and we've had nice hot weather with a more reasonable amount of rain. The bell peppers are finally bearing their first fruit, and the jalapenos and banana peppers are producing more. The tomatoes have stopped producing, but I thought if I left one or two plants, they might start back up. I pulled out the tired bush beans and one of the tomato plants and threw them in the compost bin. In the empty squares, I pulled the weeds, added a scoop of compost, and mixed it up real well.

That left me with seven squares ready to plant. Unfortunately, cauliflower and broccoli are space hogs, so I could only plant one cauliflower seedling per square foot. I planted two squares of cauliflower, and two squares of broccoli seed. In another square I planted 16 carrots, and in the 6th square I scattered mesclun salad mix without thought to rows. Since mesclun (aka baby salad greens) is harvested when it's young and tender, I thought it would be happy being a little crowded. I couldn't decide what to do with the 7th square. I have more cauliflower seedlings that need a home, but I also have radish seeds I could plant, or another square of salad greens. I'll probably do some more planting next week. I finished up my planting by watering everything in really well. With all this heat, I'll need to stay on top of watering to keep those seedlings happy.

My vegetable garden before (left) and after (right) my fall planting.
The whole process took me an hour. The longest part was getting the bed ready--deciding what to keep, pulling out old plants, and preparing the soil. The planting part was quick. I can't wait to enjoy my delicious harvest this fall!

Thursday, August 15, 2013

The Beautiful Edible Garden

I finally got to spend some time cleaning up my garden this weekend. It was a busy weekend, but I took a free hour to pull weeds, remove dead plants, and do some light pruning. I hurt my back a couple of weeks ago, so I couldn't get in the garden until I recovered last week. When I finally checked on it there was a 3-inch-long tomato hornworm that had defoliated about 25% of my tomato plants. Fortunately, the vines were already huge to begin with, and the big, fat green tomatoes were untouched. But learn from me: check for tomato hornworms constantly before they get out of hand! If you keep an eye on your plants, there's no need to use chemicals, just remove the worms as you see them.

I had a hard time getting a good close-up of the giant
tomato hornworm, but you get the idea.

I'm delighted one of my lavender plants (which were kind of an experiment) has finally come into bloom. The red Flower Carpet rose behind it looks spectacular, too, so the front corner of my yard makes me smile every time I come and go.

Lavandula angustifolia 'Munstead' and 'Flower
Carpet Scarlet' roses bloom near the sidewalk.

I just finished reading The Beautiful Edible Garden by Leslie Bennet and Stefani Bittner. I am the sort of person who gardens more for the beauty than for the fruits and vegetables, but I also like the idea of harvesting my own home-grown produce (you can't beat a home-grown tomato). The title of this book intrigued me: the idea that I could have a beautiful garden and free vegetables in the same space. The colorful pictures on the cover were eye-catching, too:

The Beautiful Edible Garden by Leslie Bennet
and Stefani Bittner. Isn't it pretty?

The book was just as inspiring as the cover promised. The two authors outline the basic principles of designing a garden, and then go into detail on how to flesh that out in your various spaces: the front yard, back yard, side yard, and containers. They also cover basic principles of keeping your garden healthy and fruitful: soil preparation, light, water, fertilizer, planting techniques, tools, and more. To polish it off, they sprinkle the book with various indoor arrangements to make with a combination of flowers and edible plants, so you can enjoy the beauty of your garden indoors as well. Overall, the tone is practical, down-to-earth, and filled with specific examples.

I really enjoyed their many plant lists. They offer examples of edible plants that tolerate shade, that have low water requirements, that bloom in different seasons, or that lend themselves to different garden styles. They frequently refer to different kinds of fruits or unique varieties of vegetables or herbs that you would never see in a grocery store. It inspired me to grow my own food simply so I could try Fuyu persimmons, fresh chervil, or yellow wax beans. I loved the many pictures throughout the book; the pictures alone gave me ideas for my own garden.

The book is filled with lovely photos like these. I borrowed
these images from the authors' blog.

The one limitation to the book is that they frequently refer to tropical plants, such as citrus trees, that can't be grown year-round in Georgia (unless you want to bring them inside every winter). Likewise, for my Florida readers, they list plants like pear and apple trees that need cold winters. Before you get too excited about a specific plant, you'll want to double-check in your favorite plant book (or on the internet) to make sure it can grow in your climate.

In summary, if you want to get inspired to grow your own fruit, vegetables, and herbs in a unique setting, I highly recommend this book.

Sunday, August 4, 2013

Gardening Checklist for August

Now that the busyness of July is over, I've decided it's time to turn my attention back to doing more than just making sure my plants get enough water. Fortunately, they've been very forgiving of their neglect. I picked a little bouquet today from various things blooming in my garden.

A bouquet from my garden: zinnia (Cut & Come Again mix),
'Knockout' rose, 'Flower Carpet Pink Supreme' rose,
tricolor sage, and chocolate mint.

It's still too hot for most gardening tasks, of course. There's not much planting or fertilizing to do right now. But I know fall will come and go all too fast, so I want to get a head start on what I can do now. That way, I'll be prepared to enjoy the nice weather later. Here's my checklist for August:

1. Update my annuals. Not all annuals make it through the summer. My white petunia, for example, fizzled out on me for no real reason. If you live in the South, you can pull out your dead summer annuals and plant new ones now to get you through September (and probably October). This is also a good time to trim, deadhead, and prune back tired annuals for a new flush of blooms next month. While I'm at it, I also need to get back to fertilizing with bloom booster. That way, everything will look lush when I'm lounging on my patio in the fall.

My foxgloves still have a few blooms on them.
If I prune and fertilize, I could get a flush of
blooms in a few weeks.

2. Give my roses some TLC. That three-month rose fertilizer I used in April has been well used up by now, and my 'Knockout' roses are covered mostly in spent blooms. Fortunately, rose bushes can be cut back by as much as half now. The advantage of heavy pruning is that they'll put out new shoots with plenty of blooms. I won't have flowers for a few weeks after pruning, but I should have quite a show in September/October. I'll fertilize when I prune to get that extra boost of growth. I won't be able to do much pruning or fertilizing later in the fall or I'll risk an early freeze damaging new growth.

3. Plant fall vegetables. In the South, everyone loves to grow tomatoes and squash in the summertime, but they usually give up on growing vegetables the rest of the year. I'd like to try some fall vegetables.  Some summer vegetables may also be planted now for a late harvest. Here are a few things you can plant in August in Middle Georgia: bush beans, beets, broccoli, cauliflower, collards, cucumbers (after Aug. 20), kale, potatoes (before Aug. 15), and turnips. (If you're curious, here's a vegetable planting chart for Georgia with more details.) Since I'm planting in an existing bed, I'll add a handful of compost before I plant my fall veggies to replace the nutrients used up by my summer veggies.

4. Plan future beds. Fall is a great time to plant perennials and shrubs here in the South. In order to take full advantage of that narrow window of planting time, I need to map out my plan of attack now--which plants to move, where to add new beds, and what kinds of plants I want to try. I'll track the sun patterns in my planting areas (paying close attention to what gets the hot afternoon sun) and consider which of my plants have been most successful, so I might repeat them in other areas. If I do all my research now, I should have a good shopping list when I visit the garden centers in September. If I feel up to it, I might even start doing a little soil prep for my new beds.

While I was out assessing my garden, a butterfly landed on me. It's just
one of the little delights of gardening.

What are you most looking forward to in your garden this fall? Happy gardening!

Thursday, July 25, 2013

Lessons from July

I've hardly spent any time working in my garden this summer due to the non-stop rain. I've emerged a couple of times to get the weeds under control (particularly the tree seedlings that were blocking my view while trying to back out of my driveway), but I haven't spent the weekly time in the garden I should have (I think I even made a New Year's resolution about that...oh well). At least I haven't needed to water any of my plants. I think my plant-sitting friends secretly laughed at me when I asked them to keep an eye on my plants when I went on vacation. After all, why would it suddenly stop raining all the time like it had the previous month? I felt better knowing I had a back-up waterer, though.

In late July, when the heat and humidity are the worst, it's a good time to take a look at the garden and see what's worked this summer, and what hasn't. After all, wouldn't we all like a garden that looks beautiful in the middle of the summer with little or no effort from us? That's my dream, anyway. So here it is, what I've learned in July:

1. Spend time in the garden every week. The weeds are incredible. They love this rain. I would have a lot fewer weeds if I had just spent 30 minutes a week pulling some.

Is that a weed or a petunia? I'm not sure.

2. Mulch, and mulch some more. I didn't use nearly enough mulch in my garden. There are far fewer weeds where I applied the mulch good and thick. Where I only used a thin layer of mulch, I can hardly tell between the weeds and the garden plants.

I love how this border has turned out overall, but I need to
move my hydrangea somewhere else.

3. 'Twist-n-Shout' hydrangea does not tolerate direct sun. When I was planning the flower bed on the east side of my front door last fall, I carefully watched to see how much sun it got. At the time, the answer was none. I selected plants that could tolerate full shade. At the beginning of the summer, my 'Twist n' Shout' was covered in beautiful blue blooms. Some time in June the sun moved, and the hydrangea started getting hot afternoon sun. It's a sad, sun-burned mess. When fall comes, I'll have to transplant it to a spot in my backyard where I know it won't get any direct sun.

My Flower Carpet 'Scarlet' rose has flourished.
4. Winning plants: Verbena 'Purple Homestead,' 'Flower Carpet' and 'Knockout' roses, Hosta, Torenia, and Petunia 'Purple Wave'. Those are all plants that look lush and disease-free right now. I've always sworn by heat-and-sun-loving purple verbena for summer color. 'Knockout' roses are the recent Southern favorite for a carefree rose, but the 'Flower Carpet' roses I won have lived up to every disease-free, heat-tolerant promise. (See here for a picture of what it looked like when I planted it, and compare to the picture above to see how much it has grown.) You can't beat hostas for a lovely, shady groundcover in the summertime. This was my first time growing Torenia (aka wishbone flower), but both my blue and white Torenia have looked beautiful all summer in their part-shade flower borders (they love this rain). My white petunias (variety unknown) look all but dead, but my 'Purple Wave' petunias are doing just fine.

My hostas continue to flourish and spread.
Verbena 'Purple homestead' looks great down by the
sidewalk. Surprisingly, my lavender plants are still alive.
How is your garden doing right now? I'd love to hear which plants are working well for you this summer. Happy gardening!

Friday, July 12, 2013

The Fungus is Among Us

My little garden has been fairly productive, despite my hiding inside from the heat, rain, and mosquitoes. I emerge for a few minutes every couple of days to make sure everything's still alive, pick caterpillars off my tomato vines, and harvest the fruit of my springtime labors. I've continued to harvest some beans every week, and the cherry tomatoes have been tasty (I just have to make sure to harvest them while they're orange--by the time they're red the heavy rains have split the skins). My little sunflower just emerged in the vegetable garden this week, too.

I bought a sunflower "mix", so the color was a bit of a surprise.
What do you think of my little burgundy sunflower?
At the beginning of the summer I was worrying about my plants getting enough water in the heat of July. Little did I know that we would have record rainfalls! All that wet foliage is the perfect breeding ground for fungus, one of the many plant pests that can plague your garden.

I'm not talking about the mushrooms that might pop up in your backyard--those are usually harmless (to your plants, at least--I don't recommend picking one and eating it unless you're an expert). I'm talking about the fungi you might not even realize are fungi: blackspot on your roses, powdery mildew on your crape myrtles, and Botrytis on your strawberries. There are also the ones relatively unseen: the ones with crazy names (like Pythium and Phytophthora) that cause root rot, crown rot, and damping-off. From a distance it might look like your plant is dying for no reason, but upon closer inspection you'll see the real culprit.

I took a walk around my garden and discovered a few fungi affecting my plants.

Entomosporium is a common fungal disease
on Indian hawthorn.
The shot-hole fungus on my ornamental cherry
tree loves all this rain.
I'm pretty sure this is a type of fungal leaf
spot on my lemon balm.

I'm not sure what fungus is growing on my
potted palm. I'm hoping it's just feeding
on the dead leaves and won't hurt it.

As you can see, it's not always easy to identify the many fungal diseases that plague our plants. Unless you're a plant pathologist, though, it's not really necessary to know all of them. When I worked at the USDA Fruit & Nut Lab in Byron, GA, the plant pathologist I worked with would take samples of diseased pecan leaves and stick them in petri dishes to see what grew--a bacterial leaf spot or a fungal leaf spot, for example. If your plant looks diseased, the simple fact that we have so much rain makes fungus a likely candidate. So if you suspect fungus in your garden, here are some tips for treatment:

  • If the damage is mostly cosmetic, don't worry about it. Many fungi, like those pesky leaf spots on Indian hawthorn, won't kill your plant. I don't like to go overboard with the chemicals, so I tolerate a certain level of disease on my plants. It's not worth spraying my huge cherry tree when I know the fungus will go away come fall. That same leaf spot affects my lemon balm every summer, but the damage is always minor.
  • If the damage is minor, remove the infection. If there are spots on only a few leaves, remove the diseased leaves and throw them away (or compost them thoroughly). Clean up the fallen leaves under your plant where disease might be hiding. A lot of disease spreads by rain splashing off of existing infection.
  • If there are black spots on your rose, go buy a fungicide for roses. Now. Blackspot (yes, that's actually the name) is a fungus that plagues most roses. It not only causes black spots but yellowing and defoliation. It can make your beautiful rose bush ugly fast. Buy a fungicide for roses.
  • If the damage is significant, talk to a friendly professional. The nice people at your local garden center (not Home Depot or Lowe's) probably know a lot about plants. They can recognize powdery mildew in an instant, and they can recommend the best sprays for various diseases. If you don't know a good local garden center, look up your county extension agent. You can take a leaf sample down to their office, or snap a couple (close-up) pictures with your phone and e-mail it to them. They likely have a plant pathologist on staff who can ID it for you, and they'll tell you what to buy at Lowe's or Home Depot (or whether you should give up altogether and burn your plant to the ground).
  • If you're using a spray, follow directions. Read all that fine print. The time of day and weather conditions can greatly affect the effectiveness of your spray. You also want to pay attention to safety warnings (like "avoid contact with skin").
Whether or not you're battling fungus now, there are things you can do to prevent future fungal wars:
  • Amend your soil. There's not a whole lot you can do once your plant has root rot or crown rot except keep it from happening again. If you have heavy clay soil (common in the South), water won't drain well, and fungus can breed that can kill your roots. Mix in plenty of organic matter (such as compost) before planting to improve drainage. If you're gardening in pots, always use fresh soil (since old soil may be harboring disease) and make sure there's a hole in your pot so water can drain.
  • Buy disease-free plants. Buy your plants from reputable sources, and inspect them carefully before taking them home. You don't want to bring disease home with you.
  • Buy disease-resistant plants. If you don't want to spray for blackspot, there are disease-resistant varieties of roses you can buy. My 'Flower Carpet' and 'Knockout' roses, true to their care-free promise, have remained blackspot-free. My other roses have not been so lucky. It's the same with all kinds of plants--some varieties are more resistant to disease than others. When you're buying vegetables, read the seed packets to find disease-resistant hybrids.
  • Clean up your garden. Those fallen leaves may look like great mulch, but they're breeding grounds for fungus. Rake them up in the fall and either bag them or compost them. If you choose to compost, make sure they're good and decomposed before using the compost in your garden.
Happy gardening!

Wednesday, June 19, 2013

Plant of the month: Coleus

I must admit, between the rain, the heat, and traveling, I can't remember the last time I really worked in my garden (outside of watering, of course). Fortunately, all the rain we've had has kept my plants happy, at least. If I catch a break from the rain this weekend, I need to pull out some weeds that have also flourished with the extra water.

When I worked at Bellingrath Gardens in Mobile, AL, as a summer intern, they had an extensive coleus collection. The horticulture director had a particular fondness for these widely-varied plants and, since they root quite easily, he took cuttings every time he saw a new variety. That was when I realized how many unique and beautiful coleus hybrids there are.

The hybrid wasn't labelled when I bought my coleus, so
I'm not sure which kind it is. 'Wasabi', perhaps?

I bought this chartreuse coleus plant in April when it was just a little guy to fill in a temporary hole while I waited for my hydrangeas to fill out. A couple of months later, that little coleus is over 2 feet tall! It's actually slightly taller than my hydrangea next to it. I love how it brightens up this shady flower bed, even from a distance.

Coleus' foliage colors range from burgundy to green to yellow, depending on the hybrid. Leaf shape and texture range from smooth to ruffled. No matter your tastes, you're sure to find a coleus hybrid that pleases you. As they mature, they get flower spikes (usually tiny blue flowers), but most people prefer to cut off the flower spikes before they develop to keep the plant full and bushy. 

Coleus can be planted in the garden (like I did), or it can make a nice accent in a container planting with other flowers. If you're concerned about size, there are many varieties that don't grow as large as mine. Coleus mostly prefer some shade, but many newer varieties like full sun. Since it does like shade, it works well for patios and balconies (which are usually pretty shady). Coleus prefer a lot of water, but they're pretty tolerant. If it wilts, water it, and it will bounce right back.

The best part of coleus for the South is that it loves the heat. In subtropical climates like South Florida and Mobile, it can be grown as a perennial, but elsewhere it makes a great summer annual (it doesn't tolerate freezing temperatures). Since it roots so easily, I'll probably take a cutting in late fall and grow it on my windowsill to preserve it over the winter. You can root coleus just by sticking a cutting in a glass of water.

What are some of your favorite annuals?