Showing posts with label hydrangea. Show all posts

Friday, May 16, 2014

The Cottage Garden, Year 2

 One of the very first projects I worked on in my garden was ripping out the bushes in front of my house and creating cottage-garden-style beds. Last year I mainly worked on the bed to the east side of my front door, which you can read all about here. That bed looked beautiful in the spring, but I discovered in the summer that the late afternoon sun was settling on my 'Twist-N-Shout' hydrangea and burning it to a crisp. I also discovered that I had poorly planned for winter, and that bed looked positively naked in January. My solution was to move the hydrangea to a shadier spot and replace it with a rosemary I've grown from a cutting. That spot might be too wet for rosemary (the surrounding plants need a lot of water), but since the plant is free I don't mind experimenting.

The first cottage garden bed from year 1 (above) to year 2
(below).

Everything else in that bed has pretty much doubled in size. The irises are currently covered in blooms and flopping all over the place. The climbing hydrangea has almost covered the trellis, and the lemon balm and bugleweed are competing for space.

Clockwise from top left: foxglove with iris, lemon balm with
bugleweed, hydrangea, and rosemary.

 This spring I finished filling the bed on the other side of the front door with plants. Much less planning went into this one than the last one. I just couldn't make up my mind, so I kept sticking plants I liked in there until I was done. It's a mix of plants from the first bed, other freebies, and a few impulse purchases. I played a lot with textures in this bed. I'll probably rearrange it next year after I see how all the plants do this year.

The new cottage garden bed 
Clockwise from top left: pink 'Flower Carpet' rose,
'Barbecue' rosemary with 'Silver Mound' artemisia,
hydrangea, iris with lemon balm.
In addition to the plants pictured above, I added some summer-blooming perennials which I'll add pictures of when they bloom later: 'Robert Poore' summer phlox and 'Summer Berries' yarrow. I like the appeal of different plants coming into bloom at different times, so those should give me something to look forward to during the heat of summer.

Feel free to leave a comment below if you have any questions!

Monday, November 18, 2013

What to Do When Your Garden Freezes

The weather has been crazy this month. The temperature this afternoon was 84 degrees. Just last week, we reached a record low for November 14 in Macon: 21 degrees.

Fortunately, I was prepared for the freeze. My husband and I bought more sturdy supplies to cover the vegetable garden. (Our last cover involved bamboo stakes and duct tape.) We created a frame using two 10-foot, 1/2"-diameter PVC pipes and covered it with a 6 mm-thick plastic drop cloth. It didn't keep the summer vegetables (or zinnias) from meeting their inevitable demise, but the fall vegetables were quite happy with the arrangement.

My vegetable garden with PVC framing
for cold protection the day aft
er the first
freeze
The freeze killed all the peppers.
The fall vegetables are loving the cooler temperatures.
Clockwise from top left: onions, lettuce, radish, and
cauliflower
 As for the rest of my garden, the ornamentals had a mixed response. Growing up in south Florida, temperatures just don't ever get to 21 degrees, so I still look at freezing temperatures like a fun science experiment. Like any good science experiment, I carefully documented the results. My hydrangeas looked dead the next day. Fortunately, I know they're cold hardy, so I expect they'll look fine come spring. My hostas also took the cue to start winding down for the winter. My roses didn't notice the difference. Both the rose blooms and leaves looked exactly the same as they had the day before. The pansies, too, were unfazed by the cold.

The hydrangea leaves wilted and blackened from the
freeze. The roses and pansies were unaffected.
With some plants still thriving and others dying back for the winter, you may wonder what you should be doing right now in your garden. The combination of sudden cold snaps and surprisingly warm weather confuses plants and people alike. Here are a few tips for caring for your plants in November:

1. Resist the urge to prune shrubs. You might want to jump in and trim back your pathetic-looking hydrangeas (or other shrubs), but the best thing you can do is leave them alone. Pruning signals to plants that they should branch out, and especially in the warmer weather they are likely to put out a bunch of new growth. Even if a plant is cold-hardy, all that tender new growth will be easily damaged when the next freeze hits. Wait until late in winter, when the plants are good and dormant, to do most of your pruning.

2. Resist the urge to fertilize...almost everything. Just like with pruning, fertilizing encourages tender new growth, which can be damaged by a freeze. Your plants need to be sleeping, not growing. Here in zone 8, we have some exceptions. All of your winter annuals, such as pansies, snapdragons, and ornamental kale, should be kept on a regular feeding schedule to maximize their blooms. They will continue growing quite happily through the winter. Your cold weather vegetables, too, can be fertilized as needed.

3. Plant or transplant shrubs. This is a good time to plant roses, blueberries, azaleas, and other shrubs. The cooler weather gives the roots plenty of time to get established before the summer heat hits. (Even when plants are bare and dormant, their roots are still growing.) This is also a good time to move plants to a new location. One of my hydrangeas looked unhappy every afternoon this summer, so I'll probably dig it up and move it to a shadier location in the next couple of weeks.

4. Keep watering. Just because plants are dormant doesn't mean they don't need water. The harsh wind, especially, can dry plants out fast. They don't need to be watered as often as they do in the summer, but if we go through a dry spell, throw a little water on your sleeping shrubs. If you just planted shrubs, they need  frequent water. If your pansies look wilted after a freeze, throw some water on them and they'll perk right up.

5. Rake leaves. As I mentioned in my post on fungus, fallen leaves make the perfect place for plant diseases to hibernate until they return in the winter. For the health of your plants, you should rake up the leaves and either compost them or haul them to the curb.

Happy gardening!

Thursday, July 25, 2013

Lessons from July

I've hardly spent any time working in my garden this summer due to the non-stop rain. I've emerged a couple of times to get the weeds under control (particularly the tree seedlings that were blocking my view while trying to back out of my driveway), but I haven't spent the weekly time in the garden I should have (I think I even made a New Year's resolution about that...oh well). At least I haven't needed to water any of my plants. I think my plant-sitting friends secretly laughed at me when I asked them to keep an eye on my plants when I went on vacation. After all, why would it suddenly stop raining all the time like it had the previous month? I felt better knowing I had a back-up waterer, though.

In late July, when the heat and humidity are the worst, it's a good time to take a look at the garden and see what's worked this summer, and what hasn't. After all, wouldn't we all like a garden that looks beautiful in the middle of the summer with little or no effort from us? That's my dream, anyway. So here it is, what I've learned in July:

1. Spend time in the garden every week. The weeds are incredible. They love this rain. I would have a lot fewer weeds if I had just spent 30 minutes a week pulling some.

Is that a weed or a petunia? I'm not sure.

2. Mulch, and mulch some more. I didn't use nearly enough mulch in my garden. There are far fewer weeds where I applied the mulch good and thick. Where I only used a thin layer of mulch, I can hardly tell between the weeds and the garden plants.

I love how this border has turned out overall, but I need to
move my hydrangea somewhere else.

3. 'Twist-n-Shout' hydrangea does not tolerate direct sun. When I was planning the flower bed on the east side of my front door last fall, I carefully watched to see how much sun it got. At the time, the answer was none. I selected plants that could tolerate full shade. At the beginning of the summer, my 'Twist n' Shout' was covered in beautiful blue blooms. Some time in June the sun moved, and the hydrangea started getting hot afternoon sun. It's a sad, sun-burned mess. When fall comes, I'll have to transplant it to a spot in my backyard where I know it won't get any direct sun.

My Flower Carpet 'Scarlet' rose has flourished.
4. Winning plants: Verbena 'Purple Homestead,' 'Flower Carpet' and 'Knockout' roses, Hosta, Torenia, and Petunia 'Purple Wave'. Those are all plants that look lush and disease-free right now. I've always sworn by heat-and-sun-loving purple verbena for summer color. 'Knockout' roses are the recent Southern favorite for a carefree rose, but the 'Flower Carpet' roses I won have lived up to every disease-free, heat-tolerant promise. (See here for a picture of what it looked like when I planted it, and compare to the picture above to see how much it has grown.) You can't beat hostas for a lovely, shady groundcover in the summertime. This was my first time growing Torenia (aka wishbone flower), but both my blue and white Torenia have looked beautiful all summer in their part-shade flower borders (they love this rain). My white petunias (variety unknown) look all but dead, but my 'Purple Wave' petunias are doing just fine.

My hostas continue to flourish and spread.
Verbena 'Purple homestead' looks great down by the
sidewalk. Surprisingly, my lavender plants are still alive.
How is your garden doing right now? I'd love to hear which plants are working well for you this summer. Happy gardening!

Tuesday, June 4, 2013

5 Tips for Watering Your Plants This Summer

It's officially summer here in Georgia. Temperatures have reached the 90s, and both my hydrangeas and Flower Carpet roses have started blooming.

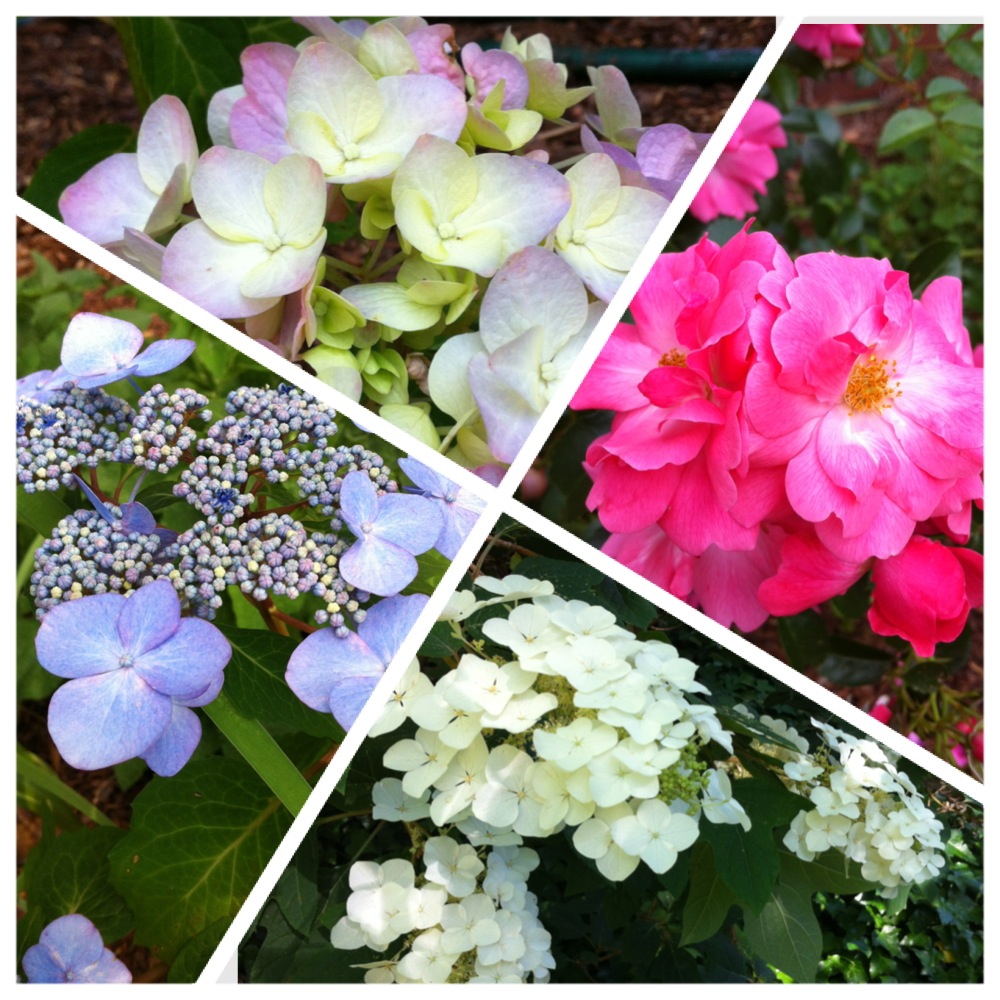
Clockwise from top: Hydrangea (variety unknown), 'Flower Carpet
Pink Supreme' rose, oakleaf hydrangea, and 'Twist n' Shout' hydrangea

The summer heat means it's time to turn our attention to watering. Lack of water (or sometimes too much water) is one of the leading causes of plant death. I've killed more plants than I can count simply because I went out of town for a long weekend in July, left my plants out on the balcony, and didn't get a plant sitter. (Fortunately I have two excellent plant sitters now, so my garden is in safe hands when I travel.)

Here are some tips for properly watering your garden this summer:

1. Water your flowers and and herbs after the top inch of soil has dried out. Just stick your finger in the soil to determine if it needs to be watered. Of course, some plants (like impatiens) like more water and others (like verbena) like less, so it always helps to know the specific needs of your plant.

2. If you can, water early in the morning. This practice has a couple of benefits. For one, you reduce plant diseases. If you water late in the day, water on the leaves doesn't have time to evaporate and just sits overnight. Wet leaves are the perfect breeding ground for fungus. Secondly, if you're using a sprinkler, you waste less water. If you water in the heat of the afternoon, much of the water evaporates before it reaches your plants.

3. Don't let your vegetable plants dry out. Lettuce, radishes, bell peppers, beans...they all like constant moisture for the best harvest. Hot peppers are one exception--they like to dry out between waterings. Be careful with overwatering your carrots and tomatoes as it gets closer to harvest--a sudden influx of water will cause the carrot or tomato fruit to split.

4. Give your lawn an inch of water a week. Some weeks they may get this from rainfall, other weeks you'll need to put a sprinkler out. You can get a container like a soup can and mark one inch from the bottom with a permanent marker to make a cheap rain gauge. Leave it outside, and if rain hasn't filled your can to the line by the weekend, water your lawn until it does reach the one-inch mark.

5. If you planted any trees or shrubs this spring, they also need an inch of water per week. Make sure they get regular water through the hot summer and into fall. Established trees and shrubs will benefit from extra watering during a drought, but otherwise can be left alone.

Happy gardening! What's blooming in your garden this month?

Thursday, May 16, 2013

My Patio Garden

From college until we bought our home last summer, my gardening was limited to windowsills, patios, and balconies. Even though I have plenty of ground to dig in around our new home, I continue to do a lot of container gardening on our patio. Some of the plants on our patio I've had for a few years. Others are recent additions. 


I've always loved herbs, and they're well-suited to pots. Some herbs I have simply because they smell nice, even though I have no idea how I'd cook with them (such as chocolate mint, lemon balm, and lemon-scented geranium). It's nice having them in arms-reach on the patio where I can enjoy their scent while relaxing with a cup of coffee in the morning.

Clockwise from top left: Strawberry, basil, rosemary,
jalapeno pepper, lemon-scented geranium, chives, and
lemon balm.

 It's nice to have the more useful herbs on the patio, too, for a quick snip while I'm cooking. Currently I have basil, chives, and rosemary there. I have some strawberry plants that I've grown in the same pot for a couple of years. They're not very fruitful, but it's fun to pick a fresh strawberry on my patio. I planted a jalapeno pepper plant in a pot upon request from my husband. He wanted to do an experiment to compare how they grow out in the raised bed versus how they do in a pot. I'll let you know how it turns out.


My godmother created this lovely seashell planter for me when I was in high school. I held onto it for years until I finally was able to decide what I wanted to plant in it and get around to putting it together. When I saw a remarkable collection of succulents for sale at Walmart last fall, I knew I'd found the perfect thing. The shallow planter dries out very quickly, but succulents don't need much water anyways. One of the plants died, but the others have more or less thrived.

'Knock Out' rose (left) and snapdragons (right) are in
bloom on my patio right now.

Normally I grow a lot of flowers in pots. I've been so busy with the rest of the garden, I haven't gotten around to planting all my summer annuals yet. I was given two Knock Out roses by friends last fall. I planted one in the ground, and the other I've decided to keep on the patio for now. The snapdragons I've had for a year and a half! I thought that they were supposed to be annuals (which means they should be dead by now). I didn't have any other plans for that pot, though, so I just cut them back when they looked sickly and they kept coming back. There's a Carolina jessamine in the lion planter next to the snapdragons that came with the house. It doesn't look like much now, but it had stunning flowers in February.

Camellia (left) and hydrangea (right) are happy in the
shade under the covering on my patio.

In addition to the rose, I have some other shrubs on my patio. I bought a camellia on sale a couple of years ago, and I thoroughly enjoyed its white flowers on my patio this winter. It won't grow very big in its little pot, but it's happy enough for now. I decided to keep one of my hydrangea cuttings on the patio this summer. It likes shade, and I can baby it while it gets a bit bigger and I decide where to plant it. Who knows, it might even bloom on my patio!

Some tips for container gardening in the South:
  • Buy good potting mix. It's worth the extra dollar for Miracle Gro brand.
  • Buy large pots, especially if you want to grow shrubs or vegetables. Smaller pots are fine for annuals or some herbs, but just remember: the smaller the pot, the more often you have to water it. In July, that can mean watering twice a day, depending on the plant.
  • Choose plants suited to how much sunlight your patio/balcony gets. (See my post Flowers Anyone Can Grow for more on how much light your plant needs). Patios and balconies usually get a lot of shade from the building and nearby trees.
  • In the summer, expect to water flowers, herbs, and vegetables once a day (unless you get rain). I've killed more plants just because I forgot to water them in the summertime (or went out of town for the weekend and didn't get someone to water my plants for me).
  • If you want really lush plants, fertilize regularly with a water-soluble fertilizer like Miracle Gro (either all-purpose, or one specifically for flowers, depending on the plant).


Vegetable Garden Update: It's been 33 days since I planted my vegetable garden, and I think it's looking lovely, don't you? We added a homemade trellis for the tomato plants (on the left side of the picture). I'm not sure the radishes are going to be edible. I remembered reading they have a really short harvest time, so I checked my book to see when they would be ready. It said 4 weeks from seed until harvest. It's been more than 4 weeks, so I kept reading until I found my answer:  "Don't let radishes stop growing or dry out;  lack of water causes hot-tasting and pithy radishes." I'm pretty sure I let the radishes dry out several times (hey, most plants like to dry out a little between waterings!), so that would explain why they're not getting fat and round. I'll have to try again in the fall (radishes don't like the heat of summer, either).

Friday, April 26, 2013

The Cottage Garden Begins

Well, it's been quite a week in the garden. Two of my roses started blooming, I've planted a bunch of new things, and two young deer (an unexpected garden "pest") seem to have taken up residence in the neighborhood. Fortunately, they've mostly stuck to eating the weeds in our backyard. They did start nibbling on the beans, though, so we'll be building a cage for the vegetable garden this weekend.

'Knock Out' Rose, and a climbing rose I can't identify.

Yes, that's a deer frolicking in my backyard.

When we bought our home last summer, I decided our quirky little Tudor Revival cottage needed a cottage garden in the front to match.  At the time, Indian Hawthorne shrubs were planted across the front of the house. Indian Hawthorne is the kind of shrub that's planted on roadsides and around apartment complexes because it's hard to kill. It gets nice flowers, but I get so tired of seeing it everywhere--it had to go. I decided to start with the area to the east side of my front door, probably because it was the biggest challenge. It gets shade most of the day, and most beautiful flowering perennials and annuals like a lot of sunshine. But I would find a way.

Front of house, summer 2012
So I started doing my research. I researched what makes a cottage garden. I poured through my plant books, cross-referenced my findings online, and made a list of cottage-garden-style plants that would tolerate shade. From there, I narrowed it down to a few that I liked the best and would look good together, and I drew a loose diagram of my bed to figure out spacing and how many plants I needed.

Then came the real work. We tore out the shrubs and prepared the beds last October. I planted a few things my friends had given me--hostas, irises, and bugleweed. I divided up my lemon balm and planted part of it in the new bed. I found a good deal on a hydrangea that needed some TLC. I added some pansies for a splash of color. I fertilized everything to help it get established.

And then I waited. Most of the plants on my list wouldn't be available until spring, and even the plants I had wouldn't really fill in for a while. Most everything went dormant.

Spring came, everything has flushed out with new growth, and I found the plants I was looking for...and then some. I just finished planting everything this week, and mulched it to keep in moisture and prevent weeds. Here's the final product:


Of course, it's not really final. The hostas and bugleweed will spread more. One of my hydrangeas is only six inches tall right now--it was from one of the cuttings I took last fall. It will eventually grow to about four feet tall and wide. My spindly little climbing hydrangea will eventually cover that trellis and then some. Some things will start blooming, some things will stop blooming. After the summer I will assess what died (if anything), or what just needs to be moved to a different spot, and I might try some new plants. It will always be a work in progress.

For reference, here's my plant list (roughly left to right):
Hosta spp.
Foxglove (Digitalis purpurea)
Iris spp. (I have no idea what kind--my friend dug it out of her garden for me, and I haven't seen it bloom yet)
Columbine (Aquilegia caerulea 'Origami Mix')
Endless Summer Twist n' Shout Bigleaf Hydrangea (Hydrangea macrophylla 'PIIHM-I')
Climbing hydrangea (Hydrangea anomola petiolaris)
Coleus (Solenostemon hybrid--I don't know which one)
Hydrangea (Hydrangea macrophylla)
Wishbone flower (Torenia hybrid)
Bugleweed (Ajuga reptans 'Purpurea')
Lemon balm (Melissa officinalis)

Happy gardening!

Monday, April 8, 2013

Project #2: Raised Bed

Spring is finally here! The hydrangeas and roses started leafing out a week or so ago, and the hostas followed shortly after. The cherry blossom trees bloomed late this year, but mine finally came into full bloom last week, followed by the dogwoods.
The hostas and hydrangeas are emerging from
dormancy (finally!).

Dogwood (left) and cherry blossoms (right) in my yard.

This spring I decided it's finally time to really try my hand at vegetable gardening. Even though I've been gardening for many years, I never really got into vegetable gardening. When I was a teenager, vegetable gardening probably didn't appeal to me because it can be so labor-intensive--preparing the soil, pulling weeds, treating diseases and pest problems. Over the years I made several half-hearted attempts at growing vegetables in pots with little success. My most successful crops in containers were the hot peppers I grew in the summer, and the mixed lettuce greens I grew in the spring.

I've been carrying around my grandfather's copy of Square Foot Gardening by Mel Bartholomew for years with dreams that one day, when I had a yard of my own, I would have a beautiful vegetable garden like the book promises. A couple of weeks ago I ran across Mel's All New Square Foot Gardening and picked it up with much excitement. After more years of experience, and adapted for the busy modern gardener, Bartholomew rewrote his recommendations, and the new recommendations include raised beds, which I like because they're pretty.

Isn't it pretty?

Now, I will say, if you ask 20 successful vegetable gardeners what their secret is to growing amazing vegetables, you will probably get 20 different answers. The square-foot gardening method, of course, has sentimental value for me, so that's why I want to try it out first. After reading the new book, here's my quick review. Even if the cover looks a little gimmicky, Bartholomew's methods are based on both years of experience and solid research. The book is full of photos and has very detailed instructions, plus a great appendix with information about each kind of vegetable, perfect for the beginner. I think he goes a little overboard on some things (I'm a little lazy if you haven't noticed), and you could probably grow half-decent vegetables without following every step. It's definitely not the most traditional method, but it's designed to grow a lot in a smaller space, which I like.

So, after reading the book, I set out this weekend to create my vegetable garden. I picked a spot that gets plenty of sunshine (which vegetables love), except for some light afternoon shade (which is great in the heat of a Georgia summer). I put it in the back of the yard behind the treehouse (so if it turns out to be a disaster, I don't have to look at it while relaxing on my patio). Instead of following Mel's instructions for building a raised bed frame yourself, I bought an easy-to-assemble kit from Home Depot because I was in a hurry. Also because I was in a hurry, I did my math wrong and bought too much material for the soil mix. But hey, at least I can still find plenty of uses for vermiculite and peat moss--like making the perfect mix for rooting cuttings! I found everything I needed at Home Depot except for the vermiculite--I found that at Johnson's Garden Center here in Macon.

My 4-foot pile of supplies--vermiculite, peat
moss, compost, and a frame.

Instead of using existing soil, Mel recommends skipping all the tilling, soil testing, and finding the right amendments, and just making your own soil mix to fill your raised bed--a mix of peat moss, vermiculite, and compost. It's full of nutrients, and has the right balance of water retention and drainage. After assembling my pile of supplies, I mixed it up batch by batch in my wheelbarrow with my handy trowel.


It took probably eight batches with the wheelbarrow, but I finally filled up my raised bed.


And there it is, my lovely 4' x 4' raised bed ready to fill with vegetables this week. Stay tuned to see what veggies get planted!

Thursday, March 7, 2013

Spring is Almost Here!

Here in Middle Georgia, spring is just around the corner. Even though the highs over the last couple of days have been in the 50s (that's cold for us!), you can see signs of spring all around the neighborhood. Even in my own yard, there are a few flowers that started blooming in February. Those late-winter/early-spring blooms fill me with hope! Here are a couple currently in bloom:

Vinca major aka periwinkle

Gelsemium sempervirens aka Carolina jessamine

Of course, many of my plants are still dormant. My husband told me the other day that my hydrangea looked dead. I reassured him (and myself) that it was normal. The hostas look non-existent. As soon as spring comes, though, they will both burst forth with new leaves.

I can't wait to start planting. We have a very narrow window where the temperatures are right for planting. Too early, and they could accidentally be killed in a late frost. Too late, and they will simply wither away in the heat and humidity of our summers. I planted several things last fall with the hopes they would have plenty of time to get established, but there were several plants that simply weren't available at the garden centers in the fall. 

There are a few things you can plant in March: bareroot hardy perennials (not usually available at garden centers, but you can order these online), roses, shrubs, and trees. If you like vegetables, this is a good time to plant asparagus, lettuce, cabbage, onions, radishes, turnips, and carrots. Look at your seed packets for exact dates. They are based on your "last frost date" (the latest date a frost is expected to occur, on average). Here on the border between zone 7 and 8, our last frost date is April 9. Here's what not to plant right now: most of what you see at Lowe's & Home Depot. I saw tomato seedlings for sale last month! They must have thought they were in Florida.

Whether or not you are planting this month, it's a great month to prepare new flower beds. I did this last fall on one of my beds. I have a lot of compacted soil. Whether or not your soil is compacted like mine, most soil can be improved by some compost or other organic matter (such as aged manure). I sort of did a lazy version of "double digging". My husband and I broke up the soil real well to a depth of about 6 inches, pulled out rocks we came across,  and then hand-tilled (mixed) in some store-bought compost. Here's an action shot of my husband at work:


I recently talked about the benefits of soil preparation in a comment on another blog, Your Easy Garden, and  won some rose bushes for my tip! I can't wait to try out my new Flower Carpet roses. The bad news: I guess I need to prep some more beds for planting. What flowers are you enjoying in your garden this month?

Monday, December 3, 2012

Fall planting

Most people get planting fever in springtime or late winter, when the first warm days arrive after the long months of cold. In Middle Georgia, though, where spring is short and summer is long, many plants are happier being planted in the fall. By planting in fall, the plants have many months to grow strong and healthy before the grueling summer hits. Even in December, a heavy frost is still unlikely for a while. (For example, the highs have been in the 70s this week!)

Unfortunately, plants are harder to find in the fall. I went hunting at my local garden centers, and the particular perennials I was looking for simply were not available. You can usually get some good deals on shrubs that need a little TLC, though. Last fall I purchased a camellia & a rose at half-price. This year I got a similar deal on a 'Twist-n-Shout' hydrangea. Unlike most hydrangeas which only bloom for a couple of weeks out of the year, this variety is supposed to bloom all summer. Mine still had a bloom on it when I planted it in October.


Endless Summer® Twist-n-Shout® Bigleaf Hydrangea
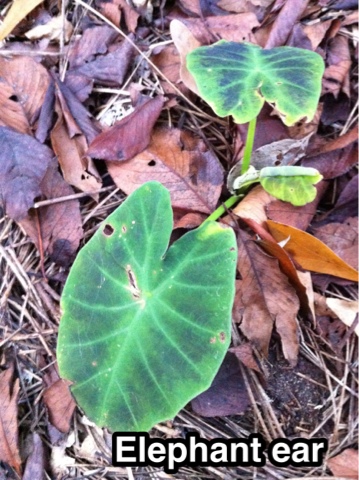
Even though I didn't buy much, I still had plenty to plant! The same friends that gave me cuttings from their yard also dug up/divided many of their self-propagating plants, including irises, bugleweed (Ajuga reptans 'Bronze Beauty'), hostas, elephant ear, and ferns. I planted in October and early November, and they all put out new growth before the cold slowed them down (as you can see in the pictures below). I also divided some lemon balm (Melissa officinalis) which was a gift from a previous year.  I can't wait for them all to take off when the warm weather returns in full force in the spring! (Maybe then I can figure out exactly what species/varieties I have.)


Happy gardening!

Wednesday, November 14, 2012

Free Plants! (My home propagation experiment)

My free plants. They may not look like much now, but wait until next summer!

Back in September, some friends of mine generously let me raid their gardens. In addition to digging up some extra plants for me, they gave me several cuttings from their hydrangeas, gardenias, and pelargonium.

The last time I had tried rooting cuttings was almost 10 years ago in my plant propagation class, and we had a professional greenhouse. In a professional setting, they use a specially-formulated, sterilized potting mix and a mist system to keep the plants moist, and the air humid. I have a book somewhere that tells me the ideal cutting length, how many leaves to remove, and the best month of the year to take cuttings. I didn't pay attention to any of that this time. What I did have was some leftover Dip n' Grow that they gave us in class, some leftover potting soil, a spot in my house with plenty of bright, indirect light, and a spray bottle.

The hydrangeas got the most attention. I stuck them in Dip n' Grow, removed some of the leaves (it cuts down on moisture loss for the cuttings), and stuck them in the old potting mix I had on hand. The saddest-looking one I stuck in water because it looked too dried-out to make it otherwise (they got a little crispy because I left them in the hot sun immediately after cutting them--I was in a hurry). After that, I sprayed them all generously twice a day with my spray bottle. I stuck the gardenias, pelargonium, and some rosemary and sage cuttings (from plants I had at home) in straight water, no dip n' grow.

The results were actually a little better than I was expecting. Six weeks later, both rosemary cuttings, 1 of the pelargonium cuttings, and 2 of the hydrangea had rooted. The hydrangea cuttings that made it were actually the one in water, and one in potting mix that lost all its leaves early on. The sage died, and the others probably won't take root at this point, but I consider it a win considering I didn't put that much money or effort into it. I took the cuttings that had rooted and re-planted them into some new Miracle-Gro potting mix to give them an extra boost, and stuck them in a sheltered spot behind my house that gets partial sun (as you see in the picture at the top of this post). They probably won't do much in this cold weather, but they will get good and acclimated and ready to grow like crazy next spring.

The moral of the story is that, with a little patience, it's easy to stretch your gardening budget with cuttings. Just buy some Dip n' Grow--it's worth every penny.