Tuesday, November 5, 2013

One Year in My Garden

Fall came early this year. My oakleaf hydrangeas and dogwoods developed some lovely fall hues that weren't there when I took pictures and started my blog around this time last year. We also got an early frost a couple of weeks ago. It snuck up on me, so my husband and I found ourselves at Walmart at eleven o'clock on a Friday night buying drop cloths and duct tape to rig together some quick protection for my vegetables. It actually turned out pretty well, considering my husband put it together at midnight while I held the flashlight for him, shivering in the cold. Here's a picture I snapped the next morning:
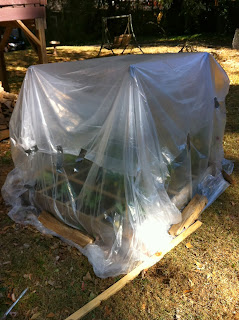
We assembled protection from the cold for
my tender vegetable plants from bamboo
stakes, drop cloths, and duct tape.
I have been enjoying this beautiful weather, tackling lots of little projects around my garden. I planted a tiny rose plant I bought from a farmers market for $3, some leftover pansies a friend gave me, red onion sets I picked up on an impulse at Home Depot, and some parsley seeds I'd been wanting to try. I think I accidentally planted onions on top of the spinach because there's something sprouting up all around the onions, and not in the square next to it where I thought I had planted spinach. (Note to self: always label my squares when I plant seeds instead of depending on my faulty memory.) I moved some dying irises to another bed where I thought they would be happier, and replanted broccoli seeds indoors after they failed to sprout outdoors last month.

I planted irises, pansies, and a rose over the weekend.
It's hard to believe I've been working in my little garden (and blogging about it) for over a year. For how little time and money I've actually spent on it, I'm pretty proud of the progress. A year ago, some of my plants were just 4" cuttings given to me by a friend, and they've grown into small shrubs. The bareroot roses I won in a contest looked like sticks when they arrived, but they really filled out and bloomed well this year. I added new flower beds and vegetable beds in areas that were just lawn a year ago. It's not the kind of transformation you see on HGTV, but I haven't spent thousands of dollars on plants and labor, either. None of the plants are looking their best this time of year, but I wanted to take pictures anyway, to track the change from when I started. 

My yard, October 2012

My yard, October 2013

Here's a summary of what I've done to my garden in the past year:

  • Removed all of the Indian hawthorn shrubs from the front of the house, and half from the back of the house
  • Planted a cottage-garden-style border on the east side of the front door, and half of the border on the west side
  • Added a small flower bed next to the sidewalk
  • Cleared out some of the ivy next to the patio and planted a shade border
  • Added a vegetable garden in a raised bed

There's an adage about new gardens that says plants sleep the first year after they're planted, creep the second year, and leap the third year. They put a lot of energy the first year into just getting established and growing their root system. I think that was somewhat true for my garden. I did enjoy some lovely blooms, but my plants seemed to spend most of their energy just filling out and growing new leaves. I can't wait to see how my garden blooms this next spring.

In the next year, my attention will shift to updating the beds behind the house and creating new beds in the back of the yard, which is mostly lawn and weeds right now. Here are a few spots I hope to improve:
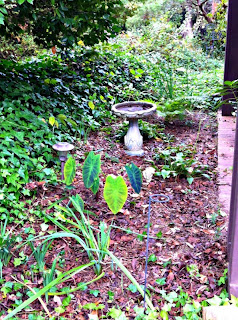
I have made some improvements to the bed
next to my patio, but it still has a long way
to go.

The very back of our yard is a large stretch of weedy
lawn and untapped potential.
Gardening requires a lot of patience. Some people put their creative energy into developing an artistic talent, others into remodeling or decorating their home. For me, my masterpiece will be my garden, and in a few years, all the sweat and waiting will be worth it.

Thursday, October 17, 2013

Lessons from My Vegetable Garden

I can't believe it's been almost a month since I last posted! Between working non-stop and fighting a cold, I could barely get in the garden long enough to water my plants. When I finally recovered, my little vegetable garden was a sad sight. My broccoli seeds had never sprouted. ALL my carrot seedlings had shriveled up and died because I missed a few days of watering them. My block of lettuce seeds looked like they had either been dug up, washed away, or both. The cabbageworms, which I thought I had under control, had multiplied and skeletonized my newest cauliflower transplant. To make matters worse, the cabbageworms managed to do that much damage while still being so tiny that I could barely see them with the naked eye.

New additions to my fall garden:
radishes and spinach

After my mourning period was over, I got to work. I broke out my environmentally-friendly pesticides and killed all the cabbageworms. I realized I still had plenty of time to replant the veggies that didn't make it (and plenty of seeds left in the packets), so I replanted my block of carrots and added to my sad little block of salad greens. While I was at it, I pulled out the okra (it only produced one single, solitary okra in the last 6 months) and planted radishes. Where the broccoli didn't sprout, I sowed spinach. The broccoli was kind of an experiment anyway: I had read it grows better from transplants than directly from seed. I'll try sowing some indoors in the next week and transplanting it outside later on.

Butterflies and moths love my hot pink zinnias.

One thing in my vegetable garden that seems quite happy right now is my zinnia. I planted it so I could enjoy the cut flowers inside, but it's also been a welcome bright spot among the veggies. I particularly enjoyed watching the butterflies on it while I worked in the garden this week.

Gardening is filled with life lessons. I admit it: when I first saw my dead carrots, disappearing lettuce, and chewed-up cauliflower plants, I wanted to give up altogether on my fall vegetable garden. I don't take failure well, and sometimes it's easier to give up than to try again. But life is full of setbacks. Things don't always go like I plan. Sometimes the pests are determined to destroy all my hard work. But in life, as in gardening, sometimes the best way to learn is through trial and error. After all, I started this blog one year ago just for that purpose: so I could keep track of what I did in my garden and learn from my successes AND failures. If I hadn't tried planting my first fall vegetable garden, I wouldn't have learned the dangers of cabbageworms, the necessity of daily watering in the fall, or that broccoli seeds need to be started inside. And if I hadn't tried again, I wouldn't have sat beside my vegetable garden long enough to watch the butterflies dance among the zinnias. Maybe God lets us experience setbacks so we will learn and grow, or maybe just so we'll slow down long enough to appreciate the little things.

So, if you think you have a "brown thumb," just remember: 1) even experienced gardeners lose a crop sometimes, 2) gardening and life are all about trial and error, and 3) celebrate the little moments of beauty that make it all worth it.

Happy gardening!

Friday, September 20, 2013

Know Your Pest: Cross-Striped Cabbageworm

It's been such a busy week between work and catching up on projects around the house, I haven't been able to do as much gardening as I would have liked. Even when I have been in the garden, most of the time has been spent watering. (The nice breezes and lack of rain dry plants out fast.) I did spend some time removing ivy and weeds from the hosta bed next to my patio, and even discovered a couple of surprises in the process.

My little garden friend can stay and eat all the
bugs he wants.
This little toad wasn't too happy with me cleaning out some of his great hiding spots, but there were still plenty of hostas for him to hide among when I was done.

Surprise camellia seedlings
I also discovered that some seeds dropped by the large camellia shrub nearby had sprouted in the hosta bed. I carefully extracted three of them and potted them up. I'm curious to see if they look like the parent, or if they come out a little different. Either way, I'll be happy; they have a great parent plant. I've never grown camellia seedlings before, so I'll be happy if two out of three live. Then I can keep one, and give one to a friend.

I've been spoiled by my garden being relatively pest-free all summer, but this week I encountered a nasty pest on my young cauliflower plants: the cross-striped cabbageworm. There are a few kinds of cabbage moths, and even though their name says "cabbage," they all affect various members of the cabbage family: broccoli, cauliflower, Brussels sprouts, collard greens, kale, and, of course, cabbage. This little guy really likes the mild fall and winter of the South, but can be found throughout the U.S. For being so small, the caterpillars can really do a lot of damage fast.

My young cauliflower plant defoliated by cabbageworms

I planted my cauliflower seedlings just two weeks ago, and when I went out to water this morning, I saw the damage. I had seen a couple of holes before, but didn't really think I had a problem until I saw half my plant was gone. Closer inspection revealed the tiny, hungry culprits hiding in the very center of the plant and on the undersides of leaves.

Here's a very close-up shot of the cross-striped
cabbageworms.
Unlike the tomato hornworms that get big and fat, these guys never get bigger than an inch long. If you don't look carefully, they can go through a whole life cycle before you ever see them. In warm weather like we've been having, they can go from egg to moth in 18 days, devouring your vegetables in the process.

Since I only have a few plants in the cabbage family right now, and the plants are small, it was easy to find all the worms and pick them off with my hands (wearing gloves, of course). Now that I know they're an issue, I'll inspect every couple of days while I'm watering the garden and remove them as I see them. If they continue to be a problem, especially as I get closer to having little baby heads of cauliflower, I might spray with an insecticidal soap as an extra measure. Any insecticide product that's labeled for caterpillars can handle these.

What's growing in your garden this week?

Thursday, September 12, 2013

Signs of Autumn in the Garden

I love autumn, but fall in the South is weird. Down here in zone 8, fall temperatures are short-lived and easily punctuated by hot spells or cold snaps. We don't really get the glorious displays of fall color that you find farther north. This September has been a perfect example--while you expect summer to be coming to an end, we've had some of the hottest weather all year. (At the local farmer's market, one grower was lamenting that they finally got their first good tomato crop for the year just this month.)

Most of the leaves have fallen from our
cherry tree.
In spite of the crazy temperatures, there are still signs of fall beyond Pumpkin Spice Lattes at Starbucks. Due to the shot-hole fungus, my cherry tree defoliated early, and I found myself this past weekend doing a typical fall chore: raking leaves. As I mentioned in my post on fungus, raking up all those disease-ridden leaves can help keep the disease from returning next year. Otherwise, the fungus just continues to live and breed in the dead leaves.

Lycoris radiata (Red spider lily) blooms in the field out
back.
The first of the red spider lilies (Lycoris radiata) just started blooming out back, which is a sure sign that summer is coming to an end. These lilies are native to China, but they naturalize quite readily in the South. They were originally introduced in the U.S. in 1854. Who knows how long ago they were planted under the dogwood tree in our backyard--they continue to spread every year. The flowers appear like magic out of the ground, without any leaves, in a great big mass in late summer or fall. They almost grow in reverse from most bulbs: after the flowers fade, then the leaves follow, growing through fall and winter until they disappear in early spring. The bulbs are actually dormant in summertime.

My white chrysanthemum looks small now, but it will fill
its pot soon.
The ubiquitous, fall-flowering Chrysanthemum ("mum" for short) is available in all the garden centers this month. I'm not a huge fan of mums--perhaps because they're everywhere, or because I don't like most of the color choices. I have to admit, though, that there are so many different varieties out there, that I actually liked a couple of the ones I saw in a recent trip to Lowe's. Also, mums are such a symbol of fall, that I decided I needed one in my garden. I settled on this creamy-white variety. I'm all about saving money in the garden, so instead of buying one of those large mums they'll be selling soon in decorative containers for $10, I bought this little guy (who's not quite in bloom yet) for $2. In the end, he'll probably be happier and healthier. Tip: When buying flowering plants, look for plants with healthy leaves and lots of buds that aren't in flower yet. Younger plants will adjust more readily to your garden than fully mature plants.

Sometimes you just have to take time to notice the little details of the season. What signs of fall do you see this week?

Thursday, September 5, 2013

Planting a Fall Vegetable Garden

In my checklist for August, I mentioned several fall vegetables you could be planting in August. But if you're like me, you probably looked outside every day and thought to yourself, "It's too hot for a fall garden." Honestly, I've read a couple of different sources about when to plant what--some say August, some say September, depending on the vegetable. Well, on Labor Day I decided fall has officially started by some definitions (even if it is 90 degrees outside here in Georgia), so I would start on my fall vegetables. Since this is my first year at a real attempt at a vegetable garden, it's still all one grand experiment for me. I started by going to Lowe's and seeing what I could find.

Some of the seeds I picked up include Mesclun Salad Mix, 'Early Green'
broccoli, and 'Red Core Chantenay' carrots. I also bought cauliflower
seedlings to get a head start.

They didn't have much that I wanted in the way of other seedlings, but the cauliflower seedlings looked appealing. Then I headed to the seed rack. The Seeds of Change rack was calling to me--all organic seeds, with many heirloom varieties, and they only cost a little bit more than the conventional seeds. I love the idea of heirloom plants--varieties that have been passed down through generations, grown by farmers who came before us 80 or 800 years ago. I picked up a handful of seed packets that promised me a tasty, organic harvest.

The next step was cleaning out my garden. I wasn't quite ready to pull up all my summer vegetables. After all, some of them were actually producing more now than they had been all summer! The sun has moved, so my vegetable bed is getting more sunshine, and we've had nice hot weather with a more reasonable amount of rain. The bell peppers are finally bearing their first fruit, and the jalapenos and banana peppers are producing more. The tomatoes have stopped producing, but I thought if I left one or two plants, they might start back up. I pulled out the tired bush beans and one of the tomato plants and threw them in the compost bin. In the empty squares, I pulled the weeds, added a scoop of compost, and mixed it up real well.

That left me with seven squares ready to plant. Unfortunately, cauliflower and broccoli are space hogs, so I could only plant one cauliflower seedling per square foot. I planted two squares of cauliflower, and two squares of broccoli seed. In another square I planted 16 carrots, and in the 6th square I scattered mesclun salad mix without thought to rows. Since mesclun (aka baby salad greens) is harvested when it's young and tender, I thought it would be happy being a little crowded. I couldn't decide what to do with the 7th square. I have more cauliflower seedlings that need a home, but I also have radish seeds I could plant, or another square of salad greens. I'll probably do some more planting next week. I finished up my planting by watering everything in really well. With all this heat, I'll need to stay on top of watering to keep those seedlings happy.

My vegetable garden before (left) and after (right) my fall planting.
The whole process took me an hour. The longest part was getting the bed ready--deciding what to keep, pulling out old plants, and preparing the soil. The planting part was quick. I can't wait to enjoy my delicious harvest this fall!

Thursday, August 15, 2013

The Beautiful Edible Garden

I finally got to spend some time cleaning up my garden this weekend. It was a busy weekend, but I took a free hour to pull weeds, remove dead plants, and do some light pruning. I hurt my back a couple of weeks ago, so I couldn't get in the garden until I recovered last week. When I finally checked on it there was a 3-inch-long tomato hornworm that had defoliated about 25% of my tomato plants. Fortunately, the vines were already huge to begin with, and the big, fat green tomatoes were untouched. But learn from me: check for tomato hornworms constantly before they get out of hand! If you keep an eye on your plants, there's no need to use chemicals, just remove the worms as you see them.

I had a hard time getting a good close-up of the giant
tomato hornworm, but you get the idea.

I'm delighted one of my lavender plants (which were kind of an experiment) has finally come into bloom. The red Flower Carpet rose behind it looks spectacular, too, so the front corner of my yard makes me smile every time I come and go.

Lavandula angustifolia 'Munstead' and 'Flower
Carpet Scarlet' roses bloom near the sidewalk.

I just finished reading The Beautiful Edible Garden by Leslie Bennet and Stefani Bittner. I am the sort of person who gardens more for the beauty than for the fruits and vegetables, but I also like the idea of harvesting my own home-grown produce (you can't beat a home-grown tomato). The title of this book intrigued me: the idea that I could have a beautiful garden and free vegetables in the same space. The colorful pictures on the cover were eye-catching, too:

The Beautiful Edible Garden by Leslie Bennet
and Stefani Bittner. Isn't it pretty?

The book was just as inspiring as the cover promised. The two authors outline the basic principles of designing a garden, and then go into detail on how to flesh that out in your various spaces: the front yard, back yard, side yard, and containers. They also cover basic principles of keeping your garden healthy and fruitful: soil preparation, light, water, fertilizer, planting techniques, tools, and more. To polish it off, they sprinkle the book with various indoor arrangements to make with a combination of flowers and edible plants, so you can enjoy the beauty of your garden indoors as well. Overall, the tone is practical, down-to-earth, and filled with specific examples.

I really enjoyed their many plant lists. They offer examples of edible plants that tolerate shade, that have low water requirements, that bloom in different seasons, or that lend themselves to different garden styles. They frequently refer to different kinds of fruits or unique varieties of vegetables or herbs that you would never see in a grocery store. It inspired me to grow my own food simply so I could try Fuyu persimmons, fresh chervil, or yellow wax beans. I loved the many pictures throughout the book; the pictures alone gave me ideas for my own garden.

The book is filled with lovely photos like these. I borrowed
these images from the authors' blog.

The one limitation to the book is that they frequently refer to tropical plants, such as citrus trees, that can't be grown year-round in Georgia (unless you want to bring them inside every winter). Likewise, for my Florida readers, they list plants like pear and apple trees that need cold winters. Before you get too excited about a specific plant, you'll want to double-check in your favorite plant book (or on the internet) to make sure it can grow in your climate.

In summary, if you want to get inspired to grow your own fruit, vegetables, and herbs in a unique setting, I highly recommend this book.

Sunday, August 4, 2013

Gardening Checklist for August

Now that the busyness of July is over, I've decided it's time to turn my attention back to doing more than just making sure my plants get enough water. Fortunately, they've been very forgiving of their neglect. I picked a little bouquet today from various things blooming in my garden.

A bouquet from my garden: zinnia (Cut & Come Again mix),
'Knockout' rose, 'Flower Carpet Pink Supreme' rose,
tricolor sage, and chocolate mint.

It's still too hot for most gardening tasks, of course. There's not much planting or fertilizing to do right now. But I know fall will come and go all too fast, so I want to get a head start on what I can do now. That way, I'll be prepared to enjoy the nice weather later. Here's my checklist for August:

1. Update my annuals. Not all annuals make it through the summer. My white petunia, for example, fizzled out on me for no real reason. If you live in the South, you can pull out your dead summer annuals and plant new ones now to get you through September (and probably October). This is also a good time to trim, deadhead, and prune back tired annuals for a new flush of blooms next month. While I'm at it, I also need to get back to fertilizing with bloom booster. That way, everything will look lush when I'm lounging on my patio in the fall.

My foxgloves still have a few blooms on them.
If I prune and fertilize, I could get a flush of
blooms in a few weeks.

2. Give my roses some TLC. That three-month rose fertilizer I used in April has been well used up by now, and my 'Knockout' roses are covered mostly in spent blooms. Fortunately, rose bushes can be cut back by as much as half now. The advantage of heavy pruning is that they'll put out new shoots with plenty of blooms. I won't have flowers for a few weeks after pruning, but I should have quite a show in September/October. I'll fertilize when I prune to get that extra boost of growth. I won't be able to do much pruning or fertilizing later in the fall or I'll risk an early freeze damaging new growth.

3. Plant fall vegetables. In the South, everyone loves to grow tomatoes and squash in the summertime, but they usually give up on growing vegetables the rest of the year. I'd like to try some fall vegetables.  Some summer vegetables may also be planted now for a late harvest. Here are a few things you can plant in August in Middle Georgia: bush beans, beets, broccoli, cauliflower, collards, cucumbers (after Aug. 20), kale, potatoes (before Aug. 15), and turnips. (If you're curious, here's a vegetable planting chart for Georgia with more details.) Since I'm planting in an existing bed, I'll add a handful of compost before I plant my fall veggies to replace the nutrients used up by my summer veggies.

4. Plan future beds. Fall is a great time to plant perennials and shrubs here in the South. In order to take full advantage of that narrow window of planting time, I need to map out my plan of attack now--which plants to move, where to add new beds, and what kinds of plants I want to try. I'll track the sun patterns in my planting areas (paying close attention to what gets the hot afternoon sun) and consider which of my plants have been most successful, so I might repeat them in other areas. If I do all my research now, I should have a good shopping list when I visit the garden centers in September. If I feel up to it, I might even start doing a little soil prep for my new beds.

While I was out assessing my garden, a butterfly landed on me. It's just
one of the little delights of gardening.

What are you most looking forward to in your garden this fall? Happy gardening!