Thursday, March 20, 2014

Pruning 101

When you have a nice Saturday afternoon, you may, like me, have the itch to get out and plant flowers, vegetables, and more. Unfortunately, it's still too early to plant tomatoes, petunias, and those other heat-loving plants we all love, but it's the perfect time to get out and prune.

There is a right way and a wrong way to prune. I see so many beautiful trees and shrubs ruined by bad pruning--even pruning done by well-meaning "landscape" companies! Good pruning makes your trees and shrubs both more beautiful and more healthy in the long term. It may take a little longer, but it doesn't have to be complicated. The reward is worth it. I'll show you how!

First: The Tools
I have three tools I use for all my pruning. I could probably use a couple more, but these three serve me just fine 95% of the time.

My favorite pruning tools, from left to right: bypass hand
pruners, loppers, and folding saw

Most of the time, I use hand pruners (Felco 2, to be exact) to cut small branches. For larger branches, or branches slightly out of reach, I use loppers. Because I have some older trees and shrubs in my yard, I use my folding saw from time to time to cut large limbs (and small trunks) that are dead or diseased.

Now I admit, I don't really like the formal look in my garden. If that's what you want, your main tool will be hedge shears.

Whatever you're using, you'll want to make sure they're sharp and in good condition. Not only do dull tools make your job more difficult, but good, clean cuts are important for the health of your plant. When you get tears or ragged cuts, those invite disease and infection to your plant. Clean cuts will heal faster and keep disease out. Here's a handy video about sharpening your pruners if they've gotten dull.

Where to Cut
If you like the formal look, it's fairly simple: shear your shrub to the shape you want. You just want to make sure the final shape is slightly wider at the bottom. If it's not, the lower branches can get shaded out by the upper branches and die off. If your shrub does get a dead branch, you'll use hand pruners or loppers to remove it.

If you want the more natural look, you'll use a combination of "thinning" cuts and "heading" cuts.

Thinning cuts involve removing a whole branch back to its origin. Thinning cuts are good for the health of your shrub because they let more light into the canopy. Thinning cuts are especially good for removing crossing branches. Not only are crossing branches less aesthetically pleasing, but they can rub against each other and cause wounds which make way for disease.

A thinning cut: removing a whole branch

Heading cuts have two purposes: 1) they make branches shorter and 2) they make plants branch out more and become bushier (get it? "bushier?"). To make a heading cut, you cut the tip of a branch back to right above a node. A "node" is where a leaf grows out of a branch. When you cut the branch back, it's also where a new branch will grow out. Most of the time, a new branch will grow in whichever direction that node/leaf is facing. If possible, you'll want to cut back to a node that is facing outward, not inward, for a healthier, more attractive plant.

The best branches to make heading cuts on are branches that are too long (sticking out) or where there's a hole in your shrub. A heading cut will cause a plant to branch out, filling in the hole in the overall shape. Of course, if your plant already has a mostly even shape, you can still use heading cuts evenly spaced around the shrub to get a denser look (or, for flowering shrubs, to get more flowers).

A heading cut: making a branch shorter 

When to Prune
As I mentioned, March is a great time to prune, but it's not the only time you can prune. For your regular, green, non-flowering trees and shrubs, you can pretty much prune from January through August. Fall is a bad time for pruning because pruning can cause a sudden flush of new growth, which is easily damaged by an early frost.

For your spring-flowering trees and shrubs, such as azaleas, camellias, dogwood, forsythia, and cherry trees, now is actually a terrible time to prune. You should wait until May or June (after they flower) to do any significant pruning. If not, you'll be pruning off the flower buds, and it will take them another year to grow more buds.

For your summer-flowering trees and shrubs, such as hydrangeas, gardenias, crape myrtles, and magnolias, it's fine to prune in the springtime.

As for roses...whole books could be written on the subject of pruning roses. (Someone actually wrote one, as a matter of fact.) Typically roses are given a good hard pruning in February, leaving 3 to 5 main canes (branches) that are cut back to 2 feet tall. All the smaller branches are removed. Then, as roses bloom, the dead blooms are cut off to encourage the plant to keep blooming. For the ubiquitous 'Knockout' roses, this isn't really necessary--they'll keep blooming anyway--but I think they look nicer if you remove all the old dead flower parts from time to time.

Have fun pruning, and feel free to leave a comment below if you have any questions about pruning your shrub.

Tuesday, February 25, 2014

Plant of the month: Camellia

One of the underrated gems of the Southern garden is the camellia. Camellias are like roses that bloom in winter. The flowers come in every shade from red to white, and in every size from a ping-pong ball to a softball.

Just a few of the camellias currently blooming in and
around my garden

There are so many different varieties that a whole organization, the American Camellia Society, is devoted to them. Their headquarters at Massee Lane Gardens are located not far from here, in Fort Valley, GA. If you visit Massee Lane, you can see over a thousand different varieties of camellias on display.

Historic marker in Third Street Park in downtown Macon,
where the first public camellia show was held

Even though the headquarters are in Fort Valley, the American Camellia Society was actually founded here in Macon. We live just a few blocks from where Dr. William G. Lee, one of the founders of the ACS, once lived. His estate, now a public park, is another hidden gem with lovely trails among the old camellias. If you're in Macon and want to visit, just head to the north end of Glenridge Drive. It's a short street, so it's not hard to find.


In our side yard between our property and our neighbor's, there are 8 different varieties of camellias. Since our own home was built in the 1920s, I wonder how old the camellias are. Perhaps they were purchased at an ACS camellia show in the 1930s, or maybe they were even gifts from Dr. Lee! It's just as possible that they were planted in the 1980s, but it's fun to dream.

Depending on the species and variety, camellias will bloom anytime from October through April. They are evergreen, so their dark green, glossy leaves look beautiful all year. There are two main species of camellias grown in the landscape: Camellia japonica and Camellia sasanqua. As a general rule, Camellia japonica varieties have larger leaves and blooms, compared with Camellia sasanqua (sometimes called "sasanquas" for short). Sasanquas usually bloom earlier, in fall and winter, while Camellia japonica varieties bloom more in winter and spring.

Whichever species and variety you decide on, here are some facts to help you care for your camellias:

Sun: Camellias thrive in light shade and look their best when protected from hot afternoon sun. Sasanquas will tolerate more sun.
Soil: They prefer a well-drained spot, rich in organic matter, with slightly acid soil.
Water: Give camellias regular water for several months after they're planted. Once established, they rarely need to be watered, except perhaps during a summer drought.
Pruning: If you'd like to prune to improve the shape of your camellia, do so immediately after they bloom.
Fertilizer: They don't like to be heavily fertilized, but if they're looking like they could use a boost, pick up an azalea fertilizer--it contains the acid that camellias like.
Other: A layer of mulch will keep your camellia roots cool and happy. If your flowers are turning brown and falling off, be sure to clean them up. It's a sign of a fungal disease that will continue to spread if you leave the diseased blooms on the ground. Some bud drop (when buds fall off before they bloom) is normal for camellias, so don't panic if you notice it in your camellias.

Wednesday, February 5, 2014

How to Start Seeds Indoors

After crazy cold weather through most of January, February seems to have warmed up for now, giving me hope that spring will, indeed, come. I spent most of January coping with indoor gardening projects. My mother gave me a terrarium for Christmas so I would have a little tiny jungle to enjoy in the cold of winter. It took me a while to get the water balance right, but I think it's finally stabilizing. I bought some flowers to brighten up my home, too. I just couldn't resist the little tiny purple irises at the grocery store. I put them in my own pot, and added some moss, and they make my living room feel like spring.

Iris reticulata

Now is the perfect time to start thinking about your summer vegetable garden. If you want to save a little money and get the best possible harvest from your garden, you should consider starting your vegetable plants from seed indoors. I admit, I shied away from growing plants from seed in the past. My few attempts never worked out well, and I didn't have the patience. After doing some research, though, I've decided to give it a try again this year for a few reasons:
  • Vegetable plants from the garden center are much more expensive than seeds.
  • When you grow plants from seed, you have many more choices, so you can choose varieties that are better suited to your garden, more disease resistant, tastier, or just more fun.
  • Growing your own plants means you can control how they're grown, especially if growing organically is important to you.
  • Homegrown plants are likely to adjust to your garden more quickly than plants that have been grown 500 miles away, traveled in a truck, and sat in a store for weeks.
  • I've figured out a few "tricks" that aren't hard and will increase my chances of success (and yes, I plan on sharing them with you).

I planted parsley seeds last month, and they've
sprouted nicely.
So, do I have you convinced to try growing your own plants from seed? If you're ready to experiment with starting seeds indoors, I'm ready to share everything I know so far. I'll report back in a couple of months and let you know if it worked. If you are growing seeds indoors for the first time, I'd love it if you would let me know how it worked for you, and we can compare notes! So, step by step, here it goes:

1. Buy good seeds. For a single pepper or tomato, there are many varieties to choose from. For example, I was recently looking at plum tomatoes because they make the best sauce. If you go to Burpee's website, you'll find eleven varieties of plum tomato alone! If you go to other companies, they will have some of the same varieties, but also other ones. Each variety has different features. I usually look for varieties that are naturally resistant to diseases, so I won't have to spend as much time fighting fungus or plant viruses in my garden. If you go to Johnny's Seeds and look at the 'Granadero' tomato, for example, you'll see it's resistant to Tomato Spotted Wilt Virus, nematodes, and blossom end rot. 

You can also choose varieties of vegetables that are more compact (if you have a very small garden), are more heat tolerant, produce more fruit, bear fruit faster, bear fruit longer, or are different colors and shapes, depending on what you like. For the more environmentally conscious, there are many organic and heirloom seeds available. Whatever variety you choose, make sure you choose a reputable seed company--their seeds are more likely to be healthy, viable and disease-free. In addition to Johnny's and Burpee, I also recommend checking out Seeds of Change (all of their seeds are organically grown), and Baker Creek Heirloom Seeds (all heirloom varieties). One more note about shopping for seeds: the earlier you shop, the better your selection. Popular varieties will sell out fast.

A note of warning: not all plants like to be started from seed indoors and transplanted later. A few that do well include peppers, tomatoes, eggplant, and squash.

2. Buy something to grow your seeds in. First, you'll need a container. I bought a 72-cell seed starter tray (also known as a "flat") that came with a tray for water drainage, and a dome to keep the moisture in (see below). You could probably use just about anything as long as it's sterile. Seed starter trays are nice because you can grow many plants in a small space. Also, because they have their individual compartments, the plants are easier to transplant without disturbing the young roots. If you choose to reuse a pot that you've used previously, sterilize it first (a mild bleach solution works well) to kill any remaining plant diseases.

72-cell flat with dome to seal in moisture and tray to collect water
drainage (left), seedstarting mix (right)

After you have your container, you'll need your "dirt." I recommend planting seeds in specific germinating or seedstarting mix. Seedstarting mix, unlike potting soil or garden soil, has the perfect balance of water retention and drainage, is disease-free, and has the right level of nutrients for your young seedlings. I'm experimenting with organic gardening more this year, so I chose an organic seedstarting mix from Gardener's Supply.

3. Find a warm, sunny place. Warm-weather veggies such as tomatoes and peppers need soil temperatures of 70-85 degrees to germinate! If you have a warm spot in your house, like next to an appliance, that would be ideal for starting your seeds. If not, you can buy a heat mat designed for just this purpose. It's a little pricey, but I think it's worth the investment. You can use it for years, and it greatly extends your growing season. I got mine off of Amazon, and it's the perfect size for my seed tray.

Every plant is different, but as a general rule seeds prefer the dark while they're germinating. After they sprout, they'll need a sunny spot next to a window.

4. Get planting...at the right time.  Each type of plant has its own growth rate. Some seeds germinate in a matter of days, others can take three weeks or more. Even after they germinate, some plants grow faster than others. Tomatoes and peppers can be started inside about six weeks before your last frost date. (If you don't know your average last frost date, you can look it up here.) Squash and cucumbers, since they grow so fast, are started only two weeks before your last frost date.

Once you figure out when your seeds need to be planted, you're ready to plant. Here are your six steps, as illustrated below:
     1) Add soil to your container.
     2) Lightly press the soil down into the container with your finger, and add more soil if needed.
     3) Moisten the soil with lukewarm water (a spray bottle works well).
     4) Create a hole for your seeds using an old pencil. (Check the back of your seed packet to see how deep your seeds like to be planted.)
     5) Add your seeds to the hole.
     6) Lightly cover up your seeds with a sprinkle of soil after planting.


5. Don't expect perfection. A friend told me a story once that she and her husband had a little competition. They each planted one seed in a pot and waited to see whose plant would grow faster. Neither seed germinated, and they gave up. It made me laugh. All other things aside, not every seed in a seed packet will germinate. While some plants have a natural germination rate of 99%, others may only have a germination rate of 60%. Out of the ones that germinate, some may be stronger, while others may be weaker. A small percentage of seedlings will probably die, even under the best of circumstances. Know that that's normal, and plant a few extra seeds to be on the safe side.

6. Give your seeds an even supply of water. Seedlings need constant moisture. While most plants in your garden probably like to dry out a little between waterings, seedlings don't. It's harder to give them too much water, but it's easy to give them too little. Seedlings aren't very sturdy, either, so a normal hose or watering can will beat up your tiny little sprouts. If you have a water-tight tray, you can water your seedlings from the bottom, by leaving them in the tray with a layer of water to soak up. Right now I find it easiest to mist them very gently with a spray bottle every day, focusing on the soil, not the plant.

That's it! Every plant is different, of course, but if you follow those guidelines you should be able to successfully grow some of your more common vegetables and herbs from seed. Good luck, and let me know how it works for you!

Wednesday, January 29, 2014

Snow in a Southern Garden

Here in the Deep South, we don't get snow every year. When we do, it's usually less than an inch. So when we got three inches of snow last night, it was quite a big deal. It started after dark and continued well into the night. I was so excited when I woke up this morning, I felt like a kid on Christmas morning--except instead of presents from Santa, I got snow! I woke up early in anticipation of the winter wonderland that would I find outside my window, and waited anxiously for my husband to wake up so we could go outside and walk in the snow together. I took a few pictures to share with y'all. Enjoy!


Our house covered in snow
Our backyard
Up close, snow looks like miniature sculptures.

No birds using our birdbaths today.

Water droplets freeze on the tips of camellia leaves.
Camellias don't mind occasional snow.
The irises don't seem to mind the snow, either.
Onions are the only thing left growing in my square-foot
garden after all the cold.
I think holly bushes look loveliest with a fresh coat of snow.

Leyland cypress

Evidence of a nighttime visitor.

Wednesday, January 15, 2014

The Beauty of Winter

People up north laugh at our idea of winter down in the South. Things like ice and snow are rare sights for us. The highs usually are in the 50s and 60s, lows in the 30s, and typical skies are gray, cloudy, maybe a little rainy. Though the weather is mild compared to other parts of the country, I generally dislike January and February. Being from South Florida, I get tired of the cold well before spring arrives. Even if we don't have blizzards, the weather is just icky. We had a freak cold snap last week (the "polar vortex"), with highs in the 20s and 30s, lows in the teens. I was hoping for snow, but no precipitation came. You would think a blizzard came, though...we turned the heat down to save electricity, built lots of fires in the fireplace, cooked soup, and bundled up to make it through the crazy weather. Our old house just isn't built for the cold.

So when skies are gray, temperatures are cold, and not much is blooming, I have to make a little extra effort to find the beauty in my garden. I spent a few minutes in the garden checking on things during the freeze, and I thought the ice in my backyard was beautiful in the sunshine.

It rained a lot the weekend before the freeze, and my
wheelbarrow turned into a solid block of ice.

There's just something about leaves and ice in a
birdbath that's beautiful to me.

When we finally had some nice weather on Sunday, I took a walk around the yard to discover that the half-dead dogwood tree I had been meaning to cut down had fallen on the nearby holly. (We had some storms over the weekend.) Even if I was relieved that Mother Nature had done half of the work for me, it was kind of sad to see the fallen tree covered in buds. I decided to make the best of it and cut armfuls of branches to try to force inside.

Difficult to capture with my cheap digital camera, but the
colors in a dogwood bud are stunning up close.
"Forcing" means taking branches from trees and shrubs that typically bloom in spring or summer and getting them to bloom in vases inside, before they'd normally be blooming outside. Branches that can be forced include cherry, crab apple, flowering almond, dogwood, quince, forsythia, and redbud. It takes a little effort and some patience to coax the branches from bud into flower, but it's simple enough for anyone to do. You simply put the branches in a tall vase or bucket with plenty of water in a cool, dark room. The water should be changed daily, and the branches should also be sprayed or misted with water at least daily. Some people suggest bruising the cut end with a hammer to help the branch absorb more water. Once the buds open up, the branches can be moved to a warmer, sunnier room.

Aren't dogwood branches laden with buds
just lovely?
I have mine in a vase in the living room because I think the branches are beautiful all by themselves, even without flowers. Also, if I stick them in a closet, I'm afraid I'll forget to change the water. According to what I've read, it takes dogwood branches a whole five weeks to bloom! If you don't have much patience, try forsythia--it only takes 1-2 weeks to bloom.

Hopefully in a couple of weeks I'll have photos to share from some of my winter-blooming plants that aren't yet in flower. In the meantime, bundle up and stay warm!

Tuesday, December 17, 2013

Vegetable Garden: December Update

I should be thinking about Christmas cards and Christmas presents, but all I really want to do this week is spend time in my garden. I decided earlier this fall that I wanted to try a cool-weather vegetable garden this year. I stocked up on seeds, read all I could, and got to work in September. August just seemed too hot to be planting cold-weather vegetables.

In September I planted salad greens, broccoli, and carrots from seed, and cauliflower from seedlings I bought at the hardware store. In October I planted radishes and spinach from seed, and red onions from sets (little baby onion bulbs).

Some of the salad greens in the first planting got washed away and/or dug up by the squirrels, so I planted more seeds a few weeks later. The first planting has produced some tasty, tender baby greens, but the second planting still just looks like little tiny seedlings. It turns out early September was the perfect time to be planting lettuce.

Mixed salad greens in my garden

The broccoli seeds I planted in the garden didn't sprout at all. I read that broccoli grows much better when it's started as seedlings and then moved into the garden, so I made a later, half-hearted attempt to grow broccoli seedlings inside in vermiculite. They sprouted, but after a month of sitting on my windowsill, they still weren't very big. I got impatient and tried moving them into the garden, but they were fragile and snapped. Next year I'll try planting broccoli seeds inside in late summer, when the house is warmer, and use a different medium, and maybe I'll have some transplants ready to go in the garden by September.

The first planting of carrots died from lack of water when I was sick one warm, dry week in fall. I planted more in October, and they've stayed about an inch tall for the last month.

The cauliflower has been an epic failure, but I've learned a lot. First I fought off the cabbage worms, then I thought I had deer eating my plants. It turns out it wasn't deer--my last remaining cauliflower plant got eaten in spite of having a cage over it. Based on my research, it's probably cute little bunny rabbits that slipped in through the 4-inch gap under my cage, but I have yet to actually see rabbits in my yard. So it's still sort of a mystery. But next year I'll build a better cage.

The radishes look healthy, but also haven't gotten very big in this cold weather. I should have planted in September. They're surviving the cold, but if I get any radishes to eat, it won't be until February at this rate.

Spinach seedlings in my garden

I accidentally planted onions on top of my spinach seeds because I forgot where I planted them. I planted some more spinach seeds in early November, and they continue to grow slowly but surely, despite the squirrels digging them up every other day with their incessant digging for acorns. I think if I had planted in late September, I would have had a nice crop by now. As it is, I might get some spinach in February.

The red onions look beautiful. They're sturdy enough that the squirrels don't bother them. I actually did a second planting in early November, and they're smaller, but just as happy as the October planting. It takes about 14 weeks on average for onion sets to mature, and it will probably take a little longer as a winter crop. I expect to enjoy nice, fat onions in late winter to early spring.

My red onions don't mind a little cold.
Despite the setbacks, so far my cold-weather garden has been totally worth it. I won't get a huge harvest this year, but I know exactly what I need to do differently next year: plant earlier, water (almost) daily when the weather's warm, keep the insecticidal soap on hand, and build some really sturdy cages to keep out the cute, fluffy rodents. See? It's simple. :)

Wednesday, December 4, 2013

Christmas Gifts for Gardeners

I've always struggled with shopping for gifts. I just don't spend that much time shopping in general--for me or anyone else--so I don't know what's out there. Plus, if you're shopping for that favorite family member with entirely different interests from you, it's hard to predict what they'll love and what they'll hate. So, if you have a friend or family member who loves gardening, I'm here to help! That's the one thing I do know how to shop for. In no particular order, here are some Christmas gifts to please a range of gardeners in your life:

1. Amaryllis. This bulb makes a great gift for your favorite hostess or grandmother. You can buy them in a variety of lovely containers and in colors ranging from white to red. They're easy to grow indoors, and if you get one that's barely sprouting at Christmas, it will be in full bloom in January when gardeners like me get depressed at the lack of greenery. If they live in the South, the bulbs may be planted in the garden after they've finished blooming indoors. Jackson and Perkins is a great resource for amaryllis gift sets. You can also check your local florist or garden center for these.

Single Stardust Amaryllis from jacksonandperkins.com
2. Gift card for seeds. For your favorite vegetable gardener, get them a gift card to a seed company like Seeds for Change or Burpee. They'll have great fun pouring over the seed catalog trying to decide how to spend their gift card in preparation for spring. Seed companies carry so many varieties that you won't see at Home Depot or Lowe's. ("Do I want red peppers or purple peppers?") Your friend or family member will be thinking about your thoughtful gift when the seeds sprout in the spring and when they're harvesting the produce in the summer.

3. The finest watering can money can buy. My mother had a beautiful blue watering can that started rusting and peeling with time. After some research, I replaced it with a Haws watering can. Haws has put a lot of thought and care into creating watering cans that do the best possible job of getting water to your plants without disturbing the soil or foliage. They offer several styles based on your needs and a range of colors based on your tastes. There are several companies that sell Haws watering cans, so feel free to shop around for the best deal.

Haws watering can from williams-sonoma.com
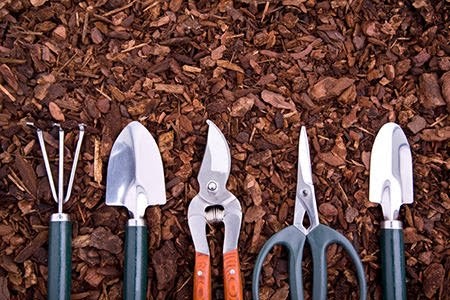
4. Tools. If you use your garden tools with any frequency, they usually need to be replaced after a few years. Metal tools get dull and rusty from use, and plastic tools get brittle and snap from being in the outdoors. Chances are, your gardener friend could use some replacements for their most frequently used tools. You can pick up cheap plastic trowels and cultivators at the hardware store that make great stocking stuffers, or splurge on fancy wood-and-metal tools with a "lifetime guarantee". If you want to get them a pair of hand pruners that will be their best friend, you can get them a Felco 2. Or, you can get them a useful tool that they might not already have, like a pair of snips for cutting flowers and vegetables or a dibble for planting bulbs.

Garden tools, from left to right: hand cultivator, hand
trowel, hand pruners, snips, transplanting trowel.
Image from from doityourself.com.
5. Plant markers. Earlier this year I had a mix-up where I planted onions on top of spinach because I forgot where I planted my spinach! Even if you're not working with seeds, plant markers are a fun way to label your herb plants or keep track of the names of your roses. Plant markers range from the boring to the artistic. For the serious gardener, I'd suggest metal plant markers that you can write the names on and will last forever. Make sure you get ones that are rust-proof, or they won't last for more than a few months. If you're looking for something more whimsical, you might check out these colorful herb markers I saw on Etsy.

Plant markers by fromArtisanHands on Etsy.com
Have a lovely Christmas season!